Welcome back, my fledgling hackers!
It's been awhile
since we did a Metasploit tutorial, and several of you have pleaded with
me for more. I couldn't be happier to oblige, as it's my favorite tool.
For the next several weeks, I'll intersperse some new guides that'll
help expand your Metasploit skills and keep you abreast of new
developments in Metasploit, so look for them in the near future.
Leaving No Evidence Behind with Metasploit
One
of the keys issues when exploiting a system is to remain undetected. If
the system admin or security engineer detects that they've been
exploited, they will likely shut off your path to the exploit, or
worse—start tracking you down!
Nearly every exploit leaves some
forensic trail for the sysadmin or law enforcement, but the key is to
leave as little as possible and then clean up as you leave. Metasploit
has module called psexec that enables you to hack the
system and leave very little evidence behind, given that you already
have sysadmin credentials, of course.
We've already spent some time learning how to get credentials using pwdump, Cain and Abel, John the Ripper, MitM, and the hashdump script
in meterpreter. If you were to log in with these newly found
credentials, your login and other actions will be tracked in the log
files.
In this tutorial, we'll assume that you already have the
sysadmin credentials and want to own the system, while leaving as little
evidence as possible that you were ever there.
Step 1: Fire Up Metasploit
Let's start by firing up Metasploit. You can do this by going through the menu system or simply typing msfconsole from a terminal. Once we have Metasploit open, we can start with psexec by typing:
use exploit/windows/smb/psexec
Step 2: Set the Options
For our options, we need to tell Metasploit what payload to use first.
set PAYLOAD windows/meterpreter/bind_tcp
Then set our remote host (RHOST).
set RHOST 192.168.2.129
Next,
we need to set our SMB user and password. As you know, SMB stands for
Server Message Block. It's a application layer protocol that runs on
port 445 that enables computers on a network to share resources such as
files, printers, etc. SMB is one of the most common attack vectors in
security intrusions.
Enter in the SMBuser now.
set SMBUser administrator
Then the SMBpassword.
set SMBPassword password
Of course, you need to use the administrator's username and password that you captured earlier.
Step 3: Exploit
Once we've entered all the information correctly for each of the options, we then simply type:
exploit
Note in the screenshot above that we have a meterpreter command prompt. Success!
Step 4: Steal the Token
Once we have a
meterpreter command prompt on a system, we basically own the box. What
we're able to do is almost unlimited. Here, I want to show you how to
steal the tokens used for service and resource authentication.
Windows,
and for that matter, most other operating systems, use tokens or
"tickets" to determine who can use what resources. We log in once and
when we do, the system checks to see what resources we're authorized to
access and then issues a token or ticket that enables us to access that
resource without our having to re-authenticate.
If we can grab the
token or ticket for a particular service or resource, then we can use
it with the same privileges as the user who was issued the token. We
don't have to know the token, simply grab it, present it to the service,
and we're in!
In this case, we want to get into the SQL Server
service. Let's first see if SQL Server is running on this system.
Meterpreter uses the Linux command ps to list services.
ps
As you can see here (highlighted in this screenshot) SQL Server is running and it has been assigned Process ID or PID of 1432.
Step 5: Steal the Token
Now that we know that the service is running and its PID, we can attempt to steal its token. Meterpreter has a command called steal_token that, surprisingly enough, attempts to steal the token from a service. Who would have thought!
It's syntax is simple and straightforward, simply the command followed by the service's PID.
steal_token 1432
As
you can see, the meterpreter has come back and indicated that our
attempt to steal the SQL Server service was successful! Now, we should
have nearly unlimited access to the SQL Server service and its
databases!
It should be repeated that psexec is only useful if you
ALREADY have the sysadmin credentials. When you do, psexec enables you
to own the the system, while leaving almost no evidence that you were
ever there.
That's it for now, but stay tuned, as I'll be offering more Metasploit tutorials in the near future.
Welcome back, my neophyte hackers!
Several of you have
written me asking how to crack passwords. The answer, in part, depends
upon whether you have physical access to the computer, what operating
system you are running, and how strong the passwords are.
In this
first installment on password cracking, we'll assume the simplest
arrangement; you're running Windows, attacking Windows, and have
physical access to the computer whose passwords you're attempting to
crack.
In
future installments, we'll look at cracking passwords remotely, with
and on Linux operating systems, and cracking famous web applications
such as Gmail and Facebook, so keep coming back!
Step 1: Download Pwdump3
Windows systems encrypt user passwords and store them in a file named SAM and store them in the following directory:
c:\Windows\system32\config
The first thing we need to do is grab this file. In an earlier article, we used Metasploit to hack into the malicious dictator's computer and grab his password hashes.
We
can also grab the hashes without Metasploit if we have physical access
to a computer on the network. This can be done with a neat piece of
software called pwdump3. It's installed on BackTrack already, but you can download it for free on Windows using the link below.
Pwdump3
is able to grab the encrypted passwords for us, and we can then crack
them with another password cracking tool. So, let's grab that SAM file
with pwdump3!
Step 2: Grab the Hashes
Open a command prompt. Now navigate to the folder where you placed your pwdump3 app. I put mine on the desktop. Now type:
When you hit enter, pwdump3 will grab the password hashes and place them in the file called "hashdumpfile.txt". Make sure that you replace "mycomputer" in the command above with the actual name of your computer. If you don't know the name of your computer, simply type "hostname" as the command prompt and Windows will return the name of your computer.
Pwdump3 can retrieve the password hashes from any computer on your network!
Step 3: Download Cain & Abel
Now that we
have encrypted passwords (hashes), we now need to decrypt them so we can
read and use them. Most hacking software is developed for the Linux
operating system, then gets ported (recompiled) for Windows, but there
is one delightful exception—Cain and Abel.
Cain
and Abel is a hacking application exclusive to Windows that has never
been ported for Linux. It's a powerful and free (but not open source)
application that every hacker should be familiar with. We'll be using
just one of its many capabilities, namely cracking Windows password
hashes.
Now that we have all the tools we need, let's start cracking those passwords!
Step 4: Crack the Passwords
Cain and Abel must be run with administrator privileges, so right-click the CAIN icon on your desktop and select "Run as administrator." It should then open up a screen that looks like this:
Next, click on the "Cracker"
tab at the top of the work area, and provide Cain and Abel the password
hashes to crack. Simply right-click on the white space in the center of
Cain and Abel and a pull-down window will appear. Select "Import hashes from a text file."
Choose
the file with the password hashes that you created with pwdump3 (in our
example, we used "hasdumpfile.txt") or retrieved on Metasploit, then
click on the "Next" button.
We can now right-click on the hashes
and select what type of hash crack we want to proceed with. The fastest
method is to use the "Dictionary attack."
If you navigate to the Cain folder on your system, you will see a folder called "Wordlist."
You can use this relatively small word list or any other word list of
your choice (there are numerous word lists available on the Internet
with millions of words).
This method attempts all words from the
dictionary file to find password matches, and generally is very fast as
it can search through even a large dictionary file in just a few
minutes. If this fails, select "Hybrid Attack" and finally, a "Brute-Force Attack." A brute force might be slow, but eventually, it will crack all passwords.
As you know, Metasploit
is an exploitation framework that every hacker should be knowledgeable
of and skilled at. It is one of my favorite hacking tools available.
Metasploit
enables us to use pre-written exploits against known vulnerabilities in
operating systems, browsers and other applications and place a rootkit/listener/payload
on the target system. These payloads are what enable us to connect to
the victim system and use it as our own after we have exploited a
vulnerability in its system. In this tutorial, we will look exclusively
at the payloads built into Metasploit.
Metasploit has many types of payloads we can leave on the target system. We are most familiar with the generic/shell/reverse_tcp and the windows/meterpreter/reverse_tcp
payloads, having used those in multiple hacks already. In this guide,
we will look at such things as how the payloads work, how Metasploit
categorizes the payloads, and what the types of payloads are. I hope
this understanding will help you to better choose the appropriate
payload for your hack.
Let's take a closer look at these payloads in Metasploit.
Step 1: Fire Up Kali Linux & Open Metasploit
When we open the Metasploit console in Kali Linux,
we immediately see that Metasploit lists the number of exploits,
auxiliary modules, post exploitation modules, payload modules, encoders,
and nops.
In the screenshot below, notice that there are 335
payloads in the current version of Metasploit (yours may be slightly
different based upon your version of Metasploit). This is a huge number
of payloads that can be used for multiple situations.
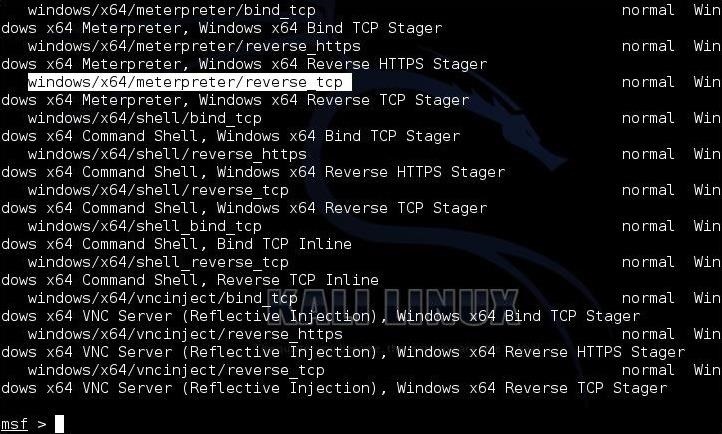
When we type: msf > show payloads
Metasploit lists all 335 payloads as below.
Step 2: Types of Payloads
Among these 335 payloads in Metasploit, there are 8 types of payloads.
Inline
These payloads are a single
package of exploit and payload. They are inherently more stable, but
because of their size, they can't always be used in small vulnerable
memory areas.
Staged
These payloads essentially are
able to fit into very small spaces and create a foothold on the system
and then pull rest of the payload.
Meterpreter
Is the all powerful
payload that we most often want on a victim system. It works by .dll
injection and resides entirely in memory, leaving no trace of its
existence on the hard drive or file system. It has a number of specific commands and scripts developed for it, enabling us to largely work our will on the victim system.
PassiveX
This payload is for use when
firewall rules restrict outbound traffic. In essence, it uses ActiveX
through Internet Explorer to hide its outbound traffic and evade the
firewall by using HTTP requests and responds just as any browser would.
NoNX
In some CPUs, there is a
built-in security feature called DEP (Data Execution Prevention). In
Windows, it is referred to as No eXecute, or NX. The idea behind this
security feature is to keep from data making its way to the CPU and
being executed. The NoNX payloads are designed to evade this safety
feature of modern CPU's.
Ord
These type of payloads work on
nearly all Windows operating systems. These are extremely small, but
somewhat unstable. They are dependent upon loading a .dll (dynamic link
library) into the exploited process.
IPv6
These payloads, as their implies, are designed to work on IPv6 networks.
Reflective DLL Injection
These
payload modules are injected directly into the target process while it
is running in memory, thereby never writing anything to the hard drive
and leaving little or no evidence behind.
Step 3: Payload Modules
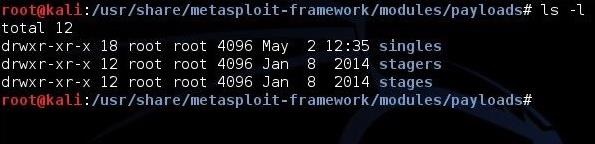
If we look in the Metasploit directory the Linux
terminal in Kali, we can see that Metasploit categorizes its payloads
into three different types. Obviously, the eight types above are
consolidated into these three directories in Metasploit. kali > cd /usr/share/metasploit-framework/modules/payloads kali > ls -l
Staged
Staged payloads use tiny
stagers (see below) to fit into small exploitation spaces. In other
words, if the victim's system exploitation buffer or other memory area
is very small and only allows a small amount of code to be executed,
first a small stager is placed in the memory area. The stager then
"pulls" the rest of the payload after this foothold is made on the
victim system.
These larger staged payloads include such complex
payloads as the Meterpreter and VNC Injection, both of which include
large and complex code. Generally, a staged payload will split the name
of the payload between a "/", such as in the payload windows/shell/tcp_bind. The "tcp_bind" is the stager (see below) and "shell" is the staged.
Unfortunately,
this convention is not used consistently in Metasploit, so one often
has to go to the "info" section of the payload or find the directory it
is in to determine if it is a staged payload.
Stagers
Stagers are the small
payloads whose only job is to fit into small memory area and then "pull"
the larger staged payload along. They kind of "plant the flag" on the
victim and then enable the larger payload to be loaded.
Singles
Often referred to as "inline
payloads," singles are self-contained units that do not require a
stager. They are generally more stable and preferred, but many times the
code is too large to for the vulnerable memory area on the victim
system.
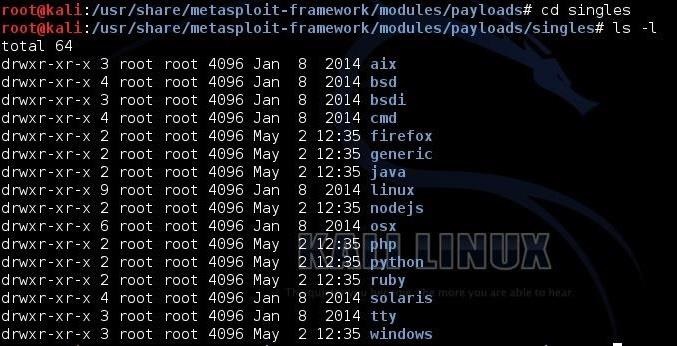
Let's now take a look inside that singles directory. kali > cd singles kali > ls -l
As
we can see, the singles are broken down by vulnerable platform. If we
want to see the singles available for the Windows platform, we simply
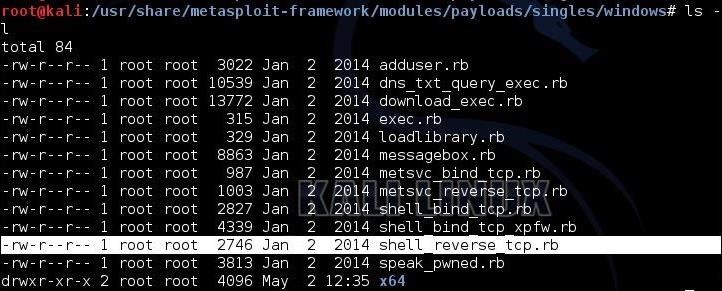
type: kali > cd windows kali > ls -l
Inside this directory we can see all the singles payloads available for Windows. I have highlighted one of these payloads, shell_reverse_tcp, that we have used in many of our hacks.
Payloads
are key part of the Metasploit infrastructure and provide us with
access once the exploit has been completed. The better we understand
them, the better we will be as a hackers.
That's it for now. Make sure to check back in on my Metasploit Basics series for more tutorials on Metasploit. So, keep coming back, my tenderfoot hackers!