How to Explore the IPv6 Attack
Surface with Metasploit

IPv6 is often described as a parallel universe, co-existing alongside existing IPv4 infrastructure in a bid to ease the transition process. Often left unmanaged and unmonitored in networks, those IPv6 packets could provide a great opportunity for the savvy attacker. Thanks to the Metasploit framework, exploring the IPv6 attack surface has become a lot easier.
Earlier this year, the creators of the Metasploit Framework introduced support for IPv6. Adding tools to allow attackers and defenders to explore this brave new world, and the increased attack surface it can offer.
In this article we will introduce Metasploit’s three IPv6 enumeration modules, how to use them, and what they are doing “under the hood”. We’ll also cover the core IPv6 concepts that allow these modules to function as they do. Finally, we’ll take a look a configuring an IPv6 tunnel from a compromised host, to allow the use of a reverse connection IPv6 payload over the IPv6 Internet.
I find few commands as satisfying to execute as “msfupdate”. To many this may sound like a strange statement, but there are plenty of people who will completely understand where I’m coming from.
Every time I enter “msfupdate”, I sit back in my chair and watch as my copy of the Metasploit Framework connects to the Metasploit servers and downloads the latest modules. I run that command at least daily, and every time I do, it always grabs me something new to dissect and work into my penetration-testing toolbox.
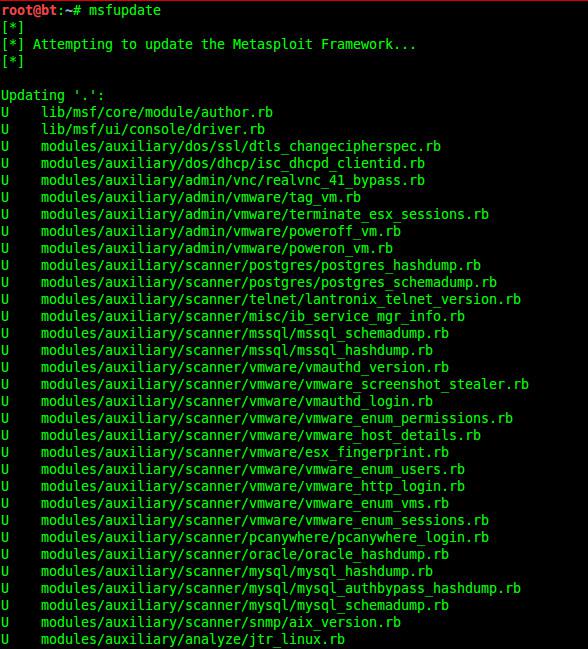
Figure 1. Typical output from “msfupdate” containing new additions and updates to existing
I’m often surprised by the frequency and volume of some of the updates, but really I shouldn’t be. After all, the whole purpose of the Metasploit project is to provide a modular framework that allows exploits to be written in a standardized fashion to encourage community collaboration. Still, it’s refreshing to see that even after the project transitioned from a “pure” open source project to commercially owned and operated one (Metasploit was acquired by Rapid 7 in 2009), the community is still contributing, and those contributions are still released under the original open-source license. According to Rapid 7, this will never change.
Earlier this year “msfupdate” fetched some updates that made me lean forward faster and look a little closer than perhaps I normally would. Metasploit downloaded a selection of modules with “IPv6” in the description.
IPv6 has been creeping into our lives over the past several years. Our operating systems, network equipment and phones have been gradually adding support for the new version of the protocol that will keep future networks and the internet running, when the current version of the internet protocol (IPv4) is finally retired due to address space exhaustion.
As you might expect, IPv6 offers some advantages over its predecessor. Primarily, the vast address space will ensure that theoretically every grain of sand on the planet could own an Internet connected device and not have to worry about hiding behind a NAT’ed IP. Additionally, IPv6 supports stateless auto-configuration – meaning that network administrators will no longer have to set up and manage DHCP servers, as IPv6 can “figure itself out” via the use of such mechanisms as neighbor discovery protocol messages sent via ICMP version 6.
This is by no means an extensive list of differences, but I’d like to pause and consider the second “advantage” of IPv6 I’ve just mentioned from a security perspective. It’s this feature of IPv6 that the first batch of Metasploit IPv6 modules take advantage of.
One thing should be made very clear before we go any further. IPv6 is not any more or less secure than IPv4. They both do different things in different ways, and understanding the differences is key for network administrators to successfully implement the new protocol in a secure fashion. The biggest insecurity in IPv6 at the moment is that there are very few IPv6-only networks out there.
99% of the time you’ll find spots of IPv6 traffic wandering across the same wires as its older sibling, quietly going about its business. Similarly, 99% of the time you can ask a network administrator what they think that traffic is up to and they’ll reply with something along the lines of “erm, well that’s just noise, we don’t use IPv6 yet”.
They likely aren’t doing anything with v6 just yet, but that doesn’t mean the devices sitting on the network aren’t. Out of the box, IPv6 is designed to “go find the quickest way to the Internet”. When you think of it like that, perhaps it’s time for network admins to “get all up” in IPv6’s business and see what it’s up to. After all, if devices are using it to communicate freely, then so can we.
Currently Metasploit features a handful of scanner modules for IPv6 discovery, and IPv6 enabled versions of its traditional payloads. A quick and easy way to locate the IPv6 modules is to run the command “search ipv6” from within the Metasploit Console (Figure 2).
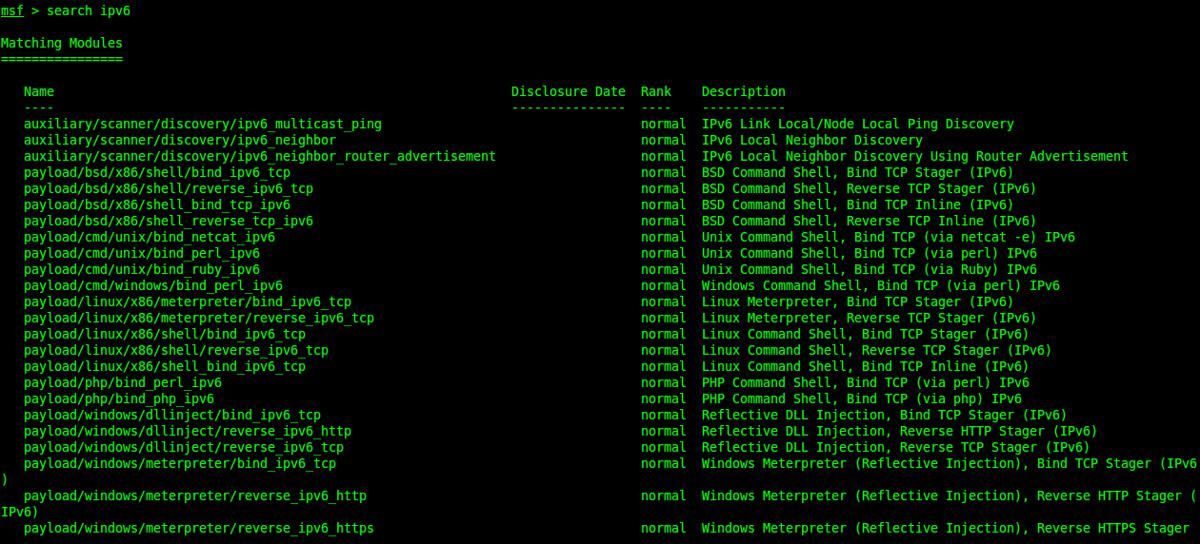
Figure 2. Currently Metasploit offers three auxiliary scanner modules for IPv6 discovery and multiple payloads that run over IPv6
Let’s take a moment to dissect the scanner modules, and what we can learn from them. First up is “ipv6_multicast_ping”, written by wuntee.
This module sends a number of ICMPv6 packets to the various IPv6 addresses that are defined as multicast addresses, to which all IPv6 enabled hosts should respond. Then it listens for the ICMPv6 echo-reply responses and records both the IPv6 address and the hardware (MAC) address of the responding host. Very quickly we can learn which hosts on our local network are IPv6 enabled. When configuring the module we have the option of specifying the source IPv6 address and source MAC. The only mandatory option is a timeout, which is set at 5 seconds by default (Figure 3).
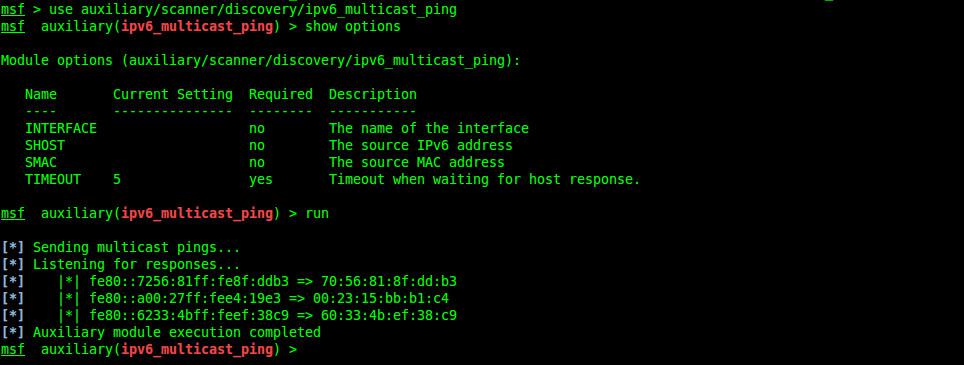
Figure 3. Quickly locating nearby IPv6 enabled hosts with ipv6_multicast_ping
Let’s take a closer look at the IPv6 multicast addresses we ping with this module. IPv6 addresses have a “scope” in which they are considered valid and unique. This could be an address in the global scope, the site scope, link-local or interface local scope. Each scope features a well-known multicast address, which certain types of host are expected to join. The module has a sequential list of those addresses that it works its way through. We can pull those addresses from the Ruby code for the module.
• FF01::1 – All nodes on the interface-local scope.
• FF01::2 – All routers in the interface-local scope.
• FF02::1 – All nodes in the link-local scope.
• FF02::2 – All routers on the link-local scope.
• FF02::5 – All OSPFv3 link state routers.
• FF02::6 – All OSPFv3 designated routers.
• FF02::9 – All RIP routers.
• FF02::a – All EIGRP routers.
• FF02::d – All Protocol Independent Multicast routers.
• FF02::16 – Multicast Lister Discovery reports.
• FF02::1:2 – All DHCP servers in the link-local scope.
• FF05::1:3 – All DHCP servers in the site-local scope.
To better understand the idea of IPv6 scopes we can compare them to their IPv4 equivalents. The global scope is best compared to any public IP address range in IPv4. A global IPv6 address can uniquely identify a host on the Internet. Site-local should be considered equivalent to RFC1918 private IP addressing and is used within a specific site, such as an office. Interface-local is similar to an APIPA or 169.* IPv4 address, and is automatically generated to allow communication across a link without the need for any other routing information.
One difference between link-local addresses in IPv6 and IPv4 is that there always needs to be one assigned to every IPv6 enabled interface – even when it has other addresses. That means that as long as there is IPv6 on the network, there will be link-local addresses in the link-local multicast scope. You can spot a link-local address because it will have the prefix “fe80”. As you might expect, these addresses cannot be routed over the Internet. So while they can be used to communicate with a machine in the same layer 2 broadcast domains as the host you are working from, if you want to be able to have fun across the IPv6 Internet, a global address is required. We’ll talk about obtaining one of those later.
Our next Metasploit module is “ipv6_neighbor”, created by belch <>. This enumeration module takes advantage of Neighbor Discovery Protocol (NDP). NDP uses a subset of ICMPv6 packets used by IPv6 to perform various auto-configuration and link state monitoring tasks to find the link-local addresses of IPv6 hosts within the same segment.
As an aside, one such NDP task is determining if it’s intended link-local address is already in use. This process, imaginatively called duplicate address detection (DAD), is actually prone to denial of service. Tools exist, although not presently modulized in Metasploit, which will respond to all DAD requests with “address in use” messages. This will prevent any new IPv6 devices that join the network from configuring a link-local address, as every option it advertises will be reported as a duplicate. One such tool for this task is “dos-new-ip6” written by van Hauser.
Back to the module in question. Its purpose is to take an IPv4 range and show you the relationship between the IPv4 and IPv6 addresses on the target network. This allows you to quickly identify which hosts are dual-stacked, that is, running both IPv4 and IPv6 side by side (Figure 4).
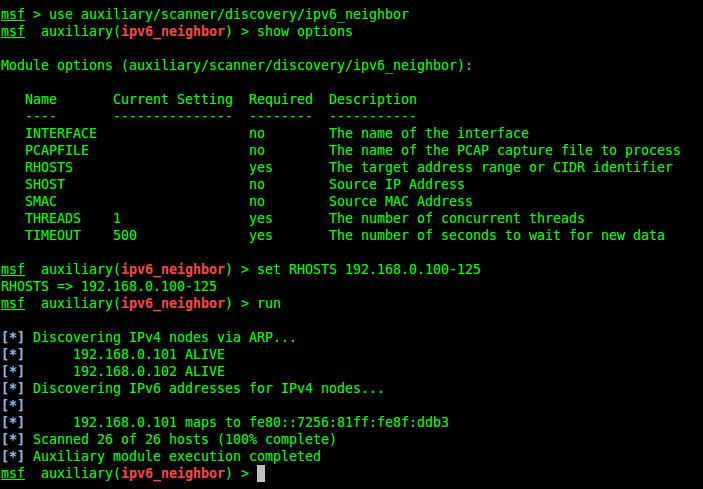
Figure 4. Mapping the relationship between IPv4 and IPv6 link-local addresses
To do this it actually completes two tasks as part of its execution. The first is a blast from the past – we perform an ARP sweep of the given IPv4 range, to learn the MAC address of each IPv4 host. Secondly it will send an ICMPv6 neighbor solicitation packet, from which we’ll learn the MAC address of the IPv6 enabled host. Compare the two MAC addresses, if any match – we have our mapping.
Seeing these two processes side-by-side is interesting as ICMPv6 neighbor discovery is IPv6’s ARP replacement, and we can compare the way they go about doing the same job. Unlike IPv4, IPv6 does not implement broadcast. The reason for this is efficiency. Traditional ARP uses broadcast to query all the hosts on the subnet to find the MAC address of an IPv4 host so it can make a layer 2 delivery. In other words, everyone gets bugged every time someone wants to locate a MAC address.
In IPv6, the process relies on multicasting – which is means that fewer hosts get bugged and the address resolution process is much quicker.
Neighbor solicitation packets are sent to a special kind of multicast address – known as a solicited-node multicast address. Each IPv6 interface will have such an address and its purpose is to provide the layer 2 (mac address) of the host. These addresses are generated using an simple algorithm, which will drop all but the last 24 bits of the hosts regular unicast address and append it with the prefix FF02::1:FF00:0/104.
Using Wireshark to capture the ICMPv6 packets sent out by the Metasploit module we can see these addresses in action (Figure 5).

Figure 5. ICMPv6 NDP packets, sent initially to the solicited-node multicast addresses of each host
Notice how in packets 231 and 232, we send a neighbor solicitation to the solicited-node multicast address ff02::1:ff8f:ddb3, and we get our response back in the form of a neighbor advertisement from the unicast link-local address of the host (fe80::7256:81ff:fe8f:ddb3). An ICMPv6 neighbor advertisement can either be sent in response to a solicitation, as we’ve just shown, or it can be sent unsolicited to an all-node multicast address to inform neighbors of a change in address or link state.
The final scanner module currently in Metasploit is ipv6_neighbour_router_advertisement, which like ipv6_multicast_ping is also written by wuntee.
ICMPv6 router advertisements and solicitations are fairly similar to neighbor advertisements and solicitations, but as you can probably guess, are used to discover routers rather than “regular” hosts. Routers transmit advertisements on a regular basis via multicast, and also in response to router solicitations from hosts on the network.
This module will aim to enumerate link-local IPv6 addresses by crafting and transmitting false router advertisements for a new network prefix via multicast. In turn this will trigger any hosts in that multicast scope to start the auto-configuration process, create a new global IPv6 address on its interface and send a neighbor advertisement for that address. The module will then manipulate the IPv6 address in the advertisement, dropping the newly acquired global prefix and replacing it with the standard link-local prefix. Finally, to confirm that the enumerated address is in fact alive it will send out a neighbor solicitation message.
This works under the assumption that the operating system uses the same interface portion of the IPv6 address on all of its addresses (Figure 6).
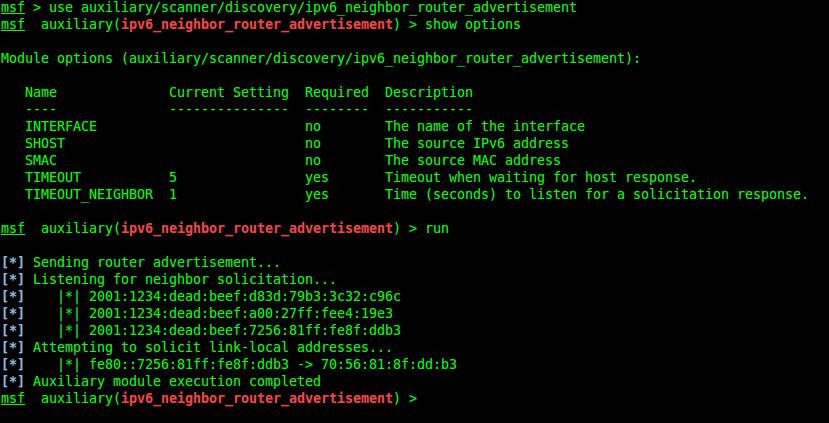
Figure 6. Using false router advertisements with “ipv6_neighbor_router_advertisement” to obtain link-local addresses
So let’s take a closer look at the module in action. We don’t need to provide any options other than a couple of timeout parameters, which by default are set at 5 and 1 seconds respectively. Once we run the module it will begin sending advertisements for the network prefix 2001:1234:dead:beef to the multicast address FF02::1, which as we know from earlier is “all nodes in the link-local scope”. Incidentally, this network prefix is hard coded into the module’s source (Figure 7).
Upon receipt of the advertisement all hosts on the local scope will begin auto-configuration of a new IPv6 address within the new prefix (Figure 8).

Figure 7. Sending an ICMPv6 router advertisement message for the network prefix “2001:1234:dead:beef”, as captured by Wireshark
Of the three enumeration modules we’ve looked at, this is by far the nosiest and therefore the most likely to be detected. We are actually taking the time to set an address on the remote host, and there is no guarantee that the interface portion of the new address will match the link-local address calculated by the module. Some systems implement randomization in the interface portion. Having said that, it’s always good to have different ways of achieving the same goal!


Figure 8. Two outputs of “ifconfig” on a Mac OS X machine on the same network as our Metasploit instance. The first output is pre-false advertisement, the second is just after. Notice the addition of a “dead:beef” IPv6 address, thanks to auto-configuration
So far we’ve concentrated on the auxiliary modules in the Metasploit framework and doing some basic IPv6 enumeration in the link-local scope. This is an important first step and assumes that you already have some sort of foothold into the network, but let’s say we now want to take things one-step further. We are going to try a break out onto the IPv6 Internet, and that means we’ll need a tunnel.
The idea of tunneling out using IPv6 encapsulated in IPv4 packets is a very attractive proposition, as many controls, such as IPS/IDS and firewalls will not be configured to alert on or prevent such traffic leaving.
So the scenario is as follows – we’ve compromised a Linux machine using Metasploit and we have a shell. The host has IPv6 support and a link-local address. Now we want to create a global IPv6 address on the box to allow it to communicate back to us over the IPv6 Internet for extra obscurity.
You need two things to get an IPv6 tunnel to work – a tunnel broker, of which there are plenty, many of them are free of charge. Secondly, if the box you are working on is behind a NAT device, it must support the forwarding of protocol 41 – in other words, IPv6 encapsulated in IPv4. If we are behind a NAT device that doesn’t forward protocol 41, we are out of luck (Figure 9).
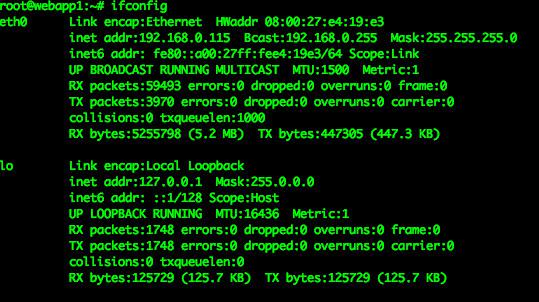
Figure 9. On the compromised Linux host “webapp1”, eth0 has an IPv4, and link-local IPv6 address
For the purposes of this example I’ll be using a tunnel provided by Hurricane Electric (he.net). Once signed up, the tunnel broker provides both a client and server IPv6 address, and an IPv4 address of the tunnel broker server.
These values will be as follows:
HE.net Tunnel Server IPv4 address – 72.52.104.74
HE.net Tunnel Server IPv6 address – 2001:DB8::20
Target Network Outside NAT IPv4 address – 1.1.1.1
Target Machine IPv4 Address – 192.168.0.115
Target Machine IPv6 Address – 2001:DB8::21
Note
You may have noticed the outside IPv4 and IPv6 addresses used in this example will not work in real life. The IPv6 address prefix I’ve used is reserved for documentation, and is not routable over the Internet.
When configuring the tunnel in the he.net site, you must provide the outside IPv4 address of the target. It should also be noted, that he.net site requires that this address responds to ping (Figure 10).
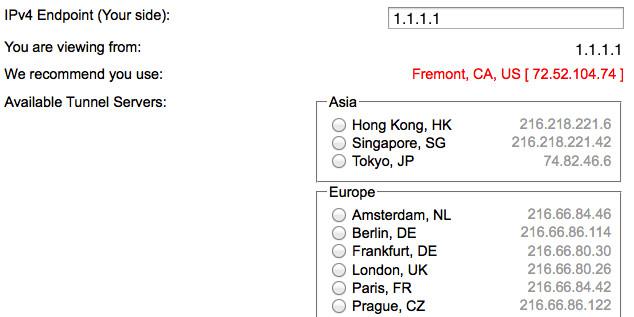
Figure 10. Signing up for an IPv6 tunnel from Hurricane Electric (ipv6.he.net)
Back on our victim machine, we run a few commands to bring up the new tunnel interface and set up a route to ensure all IPv6 traffic goes via that new interface.
“ip tunnel add ipv6inet mode sit remote 72.52.104.74 local 192.168.0.115 ttl 255” – This creates a SIT (simple internet transition) interface named ipv6inet and defines the local and remote IPv4 addresses for the tunnel endpoints, or in other words, the IP of the target machine and tunnel server.
“ip link set ipv6inet up” – This brings the tunnel interface up.
ip addr add 2001:db8::21 dev ipv6inet – This assigns the IPv6 address to the interface.
ip route add ::/0 dev ipv6inet – This command will add a route to send all IPv6 traffic across the new tunnel interface (Figure 11).

Figure 11. Creating an IPv6 tunnel interface on the target machine
A quick way to confirm that the IPv6 Internet is now within our reach is to use the ping6 utility to hit an IPv6 website. In this case ipv6.google.com, which has the address 2607:f8b0:400e:c00::93.

Figure 12. Sending ping packets to Google over the IPv6 Internet using our new tunnel interface
This tunnel can now be used by a Metasploit reverse connection payload to connect to an attacker with a global IPv6 address of their own, which of course can be obtained in exactly the same way as we’ve just shown.
Let’s say in this example we want our payload to connect back to us at the address 2001:db8::99 (Figure 13).

Figure 13. Setting up an IPv6 payload in Metasploit
Configuring an IPv6 payload in Metasploit is essentially the same as an IPv4 payload, but there are a couple of minor differences. Obviously, you must specify an IPv6 address for your listener (or target if a binding payload), and also if using a link-local address on a host with multiple interfaces, you should specify the scope ID.
To summarize, let’s take one last look at the scenario we’ve just discussed (Figure 14).

Figure 14. An overview of our IPv6-over-IPv4 tunnel set u
Conclusion
For many out there, the mere sight of an IPv6 address is enough to put them off learning more about the protocol. This is the biggest vulnerability in IPv6, and like most security vulnerabilities, it’s a human problem. The protocol is being adopted in devices at a much quicker rate than people are willing to manage and configure it properly.
For attackers, this provides great opportunities to jump on the unmanaged jumble and use it to build something that can be used to move around networks in ways that the owners of those networks aren’t expecting.
For defenders, this means developing a whole new security model with emphasis on securing the endpoints rather than the perimeter. After all, IPv6 doesn’t hide behind NAT like its predecessor.
By introducing IPv6 payloads and modules the Metasploit framework has given both groups new tools to better understand and manipulate the IPv6 protocol. Of course, we are only just getting started. The nature of the Metasploit community is to constantly build, innovate and improve upon what is already in place. These initial modules will act as a catalyst for further development in IPv6 enumeration and exploitation. Remember that the next time you run “msfupdate”, and keep one eye open for new ways to use IPv6 for exploitation.
No comments:
Post a Comment