How to Use Multiplayer
Metasploit with Armitage

Metasploit is a very cool tool to use in your penetration testing: add Armitage for a really good time. Penetration test engagements are more and more often a collaborative effort with teams of talented security practitioners rather than a solo effort.
Armitage is a scriptable red team (that is what the offensive security teams are called) collaboration tool for Metasploit that visualizes targets, recommends exploits, and exposes the advanced post-exploitation features in the framework.
Through one Metasploit/Armitage Server instance, your team can:
• Use the same sessions
• Share hosts, captured data, and downloaded files
• Communicate through a shared event log (very similar to a IRC chat if you are familiar with those)
• Run bots to automate red team tasks
What you should know
To get the most of this article you should have a working (and preferably updated) BackTrack 5 R3 system, 32-bit or 64-bit shouldn’t matter but I personally run a 32-bit system in a virtual machine.
This article makes extensive use of the command line so you should preferably be familiar with that. You should also have a workstation that can run the Armitage java GUI, which either can be the BackTrack computer in X-windows or a separate computer running Linux, OSX or Windows which can reach the BackTrack machine via the network.
Armitage’s red team collaboration setup is CPU sensitive and it likes RAM. Make sure you give the virtual machine (or physical machine) at least 1.5GB of RAM to your BackTrack 5 R3 team server.
What you will learn
After reading this article you should know how to run a Armitage server and have several clients connected to it for multiplayer Metasploit, meaning running red teams with more than a single member on the same Metasploit server.
Installation
I will base this article on BackTrack 5 R3, so get that from http://www.backtrack-linux.org/. After you have downloaded and booted it you need to start with connecting it to the network and update Metasploit Framework. The default username/password for BackTrack 5 is ”root” / ”toor”(”root” spelled backwards).
Update BackTrack and Metasploit
Before we begin we should update BackTrack to get the latest fixes by running
# apt-get update
# apt-get dist-upgrade
We should also update the Metasploit Framework by running
# msfupdate
Once that is done we are ready to get Armitage running.
Configuring Armitage
Before you can use Armitage you need to configure it and make sure it is running (and create startup-scripts so it is always started when the system boots up).
To begin with we need a shared secret (also known as a password) that is the gatekeeper between your Armitage server and its clients. Anyone who knows this password can access your server and access the results your have collected, including active sessions. Take care when choosing this password, although for this article I will chose a password that is not considered secure but is easy to read.
Manually start Armitage Teamserver
To manually start Armitage Teamserver you first need to move to the Armitage directory which is (in BackTrack 5 R3) /opt/metasploit/msf3/data/armitage by running:
# cd /opt/metasploit/msf3/data/armitage
And then to start the Armitage Teamserver you need to run ./teamserver <my-ip-address> <password> like this:
# ./teamserver 172.16.109.130 MySecretPassword
Creating start-up scripts for Armitage
To start the Armitage Team Server for true multi-player Metasploit you need to create a startup script. As of this moment the correct way to start a Armitage team server on BackTrack 5 R3 is like this: Listing 1.
Listing 1a. Updating the Metasploit Framework
#! /bin/sh
### BEGIN INIT INFO
# Provides: armitage-teamserver
# Required-Start:
# Required-Stop:
# Default-Start: 2 3 4 5
# Default-Stop: 0 1 6
# Short-Description: Armitage TeamServer
# Description: Armitage TeamServer for true Multiplayer Metasploit
#
### END INIT INFO
# Author: Michael Boman <michael@michaelboman.org>
#
PATH=/sbin:/usr/sbin:/bin:/usr/bin:/usr/local/sbin:/usr/local/bin
DESC=”Armitage TeamServer”
NAME=teamserver
ARMITAGE_DIR=/opt/metasploit/msf3/data/armitage
DAEMON=$ARMITAGE_DIR/$NAME
DAEMON_ARGS=”172.16.109.130 MySecretPassword”
PIDFILE=/var/run/$NAME.pid
SCRIPTNAME=/etc/init.d/$NAME
# Exit if the package is not installed
[ -x “$DAEMON” ] || exit 0
# Read configuration variable file if it is present
[ -r /etc/default/$NAME ] && . /etc/default/$NAME
# Load the VERBOSE setting and other rcS variables
. /lib/init/vars.sh
# Define LSB log_* functions.
# Depend on lsb-base (>= 3.0-6) to ensure that this file is present.
. /lib/lsb/init-functions
#
# Function that starts the daemon/service
#
do_start()
{
# Return
# 0 if daemon has been started
# 1 if daemon was already running
# 2 if daemon could not be started
start-stop-daemon –start –quiet –pidfile $PIDFILE –exec $DAEMON –chdir $ARMITAGE_DIR –test > /dev/null
|| return 1
start-stop-daemon –start –quiet –pidfile $PIDFILE –exec $DAEMON –chdir
$DAEMON_ARGS
|| return 2
}
#
# Function that stops the daemon/service
#
do_stop()
{
# Return
# 0 if daemon has been stopped
# 1 if daemon was already stopped
# 2 if daemon could not be stopped
# other if a failure occurred
start-stop-daemon –stop –quiet –retry=TERM/30/KILL/5 –pidfile $PIDFILE –name $NAME
RETVAL=”$?”
[ “$RETVAL” = 2 ] && return 2
# Wait for children to finish too if this is a daemon that forks
# and if the daemon is only ever run from this initscript.
# If the above conditions are not satisfied then add some other code
# that waits for the process to drop all resources that could be
# needed by services started subsequently. A last resort is to
# sleep for some time.
start-stop-daemon –stop –quiet –oknodo –retry=0/30/KILL/5 –exec $DAEMON
[ “$?” = 2 ] && return 2
# Many daemons don’t delete their pidfiles when they exit.
rm -f $PIDFILE
return “$RETVAL”
}
#
# Function that sends a SIGHUP to the daemon/service
#
do_reload() {
#
# If the daemon can reload its configuration without
# restarting (for example, when it is sent a SIGHUP),
# then implement that here.
#
start-stop-daemon –stop –signal 1 –quiet –pidfile $PIDFILE –name $NAME
return 0
}
case “$1” in
start)
[ “$VERBOSE” != no ] && log_daemon_msg “Starting $DESC” “$NAME”
do_start
case “$?” in
0|1) [ “$VERBOSE” != no ] && log_end_msg 0 ;;
2) [ “$VERBOSE” != no ] && log_end_msg 1 ;;
;;
stop)
[ “$VERBOSE” != no ] && log_daemon_msg “Stopping $DESC” “$NAME”
do_stop
case “$?” in
0|1) [ “$VERBOSE” != no ] && log_end_msg 0 ;;
2) [ “$VERBOSE” != no ] && log_end_msg 1 ;;
esac
;;
status)
status_of_proc “$DAEMON” “$NAME” && exit 0 || exit $?
;;
#reload|force-reload)
#
# If do_reload() is not implemented then leave this commented out
# and leave ‘force-reload’ as an alias for ‘restart’.
#
#log_daemon_msg “Reloading $DESC” “$NAME”
#do_reload
#log_end_msg $?
#;;
restart|force-reload)
#
# If the “reload” option is implemented then remove the
# ‘force-reload’ alias
#
log_daemon_msg “Restarting $DESC” “$NAME”
do_stop
case “$?” in
0|1)
do_start
case “$?” in
0) log_end_msg 0 ;;
1) log_end_msg 1 ;; # Old process is still running
*) log_end_msg 1 ;; # Failed to start
esac
;;
*)
# Failed to stop
log_end_msg 1
;;
esac
;;
*)
echo “Usage: $SCRIPTNAME {start|stop|status|restart|force-reload}” >&2
exit 3
;;
esac
:
Start Armitage server automatically at boot
Add the Armitage to automatically start at boot with the following command:
# update-rc.d armitage-teamserver defaults
Using Armitage
Connecting Armitage client to the Server.
Using Armitage GUI
The Armitage GUI has three main panels: modules (top to the left), targets (top to the right) and tabs (bottom), which can be resized to your liking.
Modules
The module browser lets you launch a Metasploit auxiliary module, throw an exploit, generate a payload, and run a post-exploitation module. Click through the tree to find the desired module. Double-click the module to open a module launch dialog.
Armitage will configure the module to run against the selected hosts. This works for auxiliary modules, exploits, and post modules.
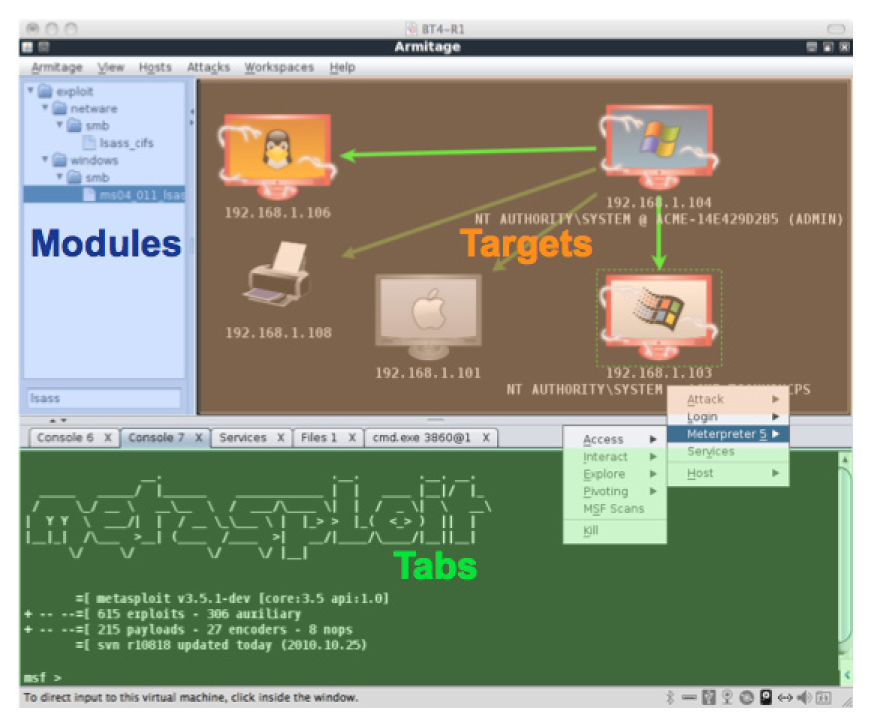
Figure 1. Armitage client connection window
Running a module against multiple hosts is one of the big advantages of Armitage. In the Metasploit console, you must configure and launch an exploit and post modules for each host you’re working with while in the Armitage GUI most of the module settings are already populated.
You can search modules too. Click in the search box below the tree, type a wildcard expression (e.g., ssh_*), and press enter. The module tree will show the search results, expanded for quick viewing. Clear the search box and press enter to restore the module browser to its original state.
Targets – Graph View
The targets panel shows your targets to you. Armitage represents each target as a computer with its IP address and other information about it below the computer. The computer screen shows the operating system the computer is running (Figure 2).
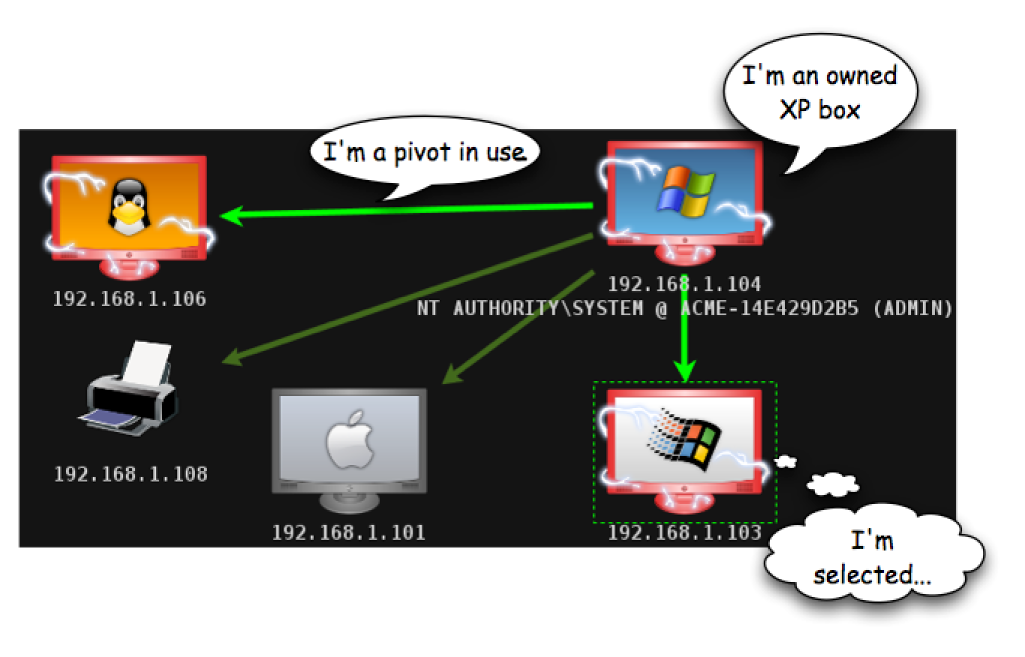
Figure 2. Description of the Armitage user interface
A red computer with electrical jolts indicates a compromised host.
A directional green line indicates a pivot from one host to another. Pivoting allows Metasploit to route attacks and scans through intermediate hosts. A bright green line indicates the pivot communication path is in use.
Click a host to select it. You may select multiple hosts by clicking and dragging a box over the desired hosts.
Right-click a host to bring up a menu with available options. The attached menu will show attack and login options, menus for existing sessions, and options to edit the host information.
The login menu is only available after a port scan reveals open ports that Metasploit can use. The Attack menu is only available after finding attacks through the Attacks menu at the top of Armitage. Shell and Meterpreter menus show up when a shell or Meterpreter session exists on the selected host.
Several keyboard shortcuts are available in the targets panel. To edit these, go to Armitage -> Preferences.
• Ctrl Plus – zoom in
• Ctrl Minus – zoom out
• Ctrl 0 – reset the zoom level
• Ctrl A – select all hosts
• Escape – clear selection
• Ctrl C – arrange hosts into a circle
• Ctrl S – arrange hosts into a stack
• Ctrl H – arrange hosts into a hierarchy. This only works when a pivot is set up.
• Ctrl P – export hosts into an image
Right-click the target area with no selected hosts to configure the layout and zoom level of the target area.
Targets – Table View
If you have a lot of hosts, the graph view becomes difficult to work with. For this situation Armitage has a table view. Go to Armitage -> Set Target View -> Table View to switch to this mode. Armitage will remember your preference (Figure 3).

Figure 3. Your preferences stored in Armitage
Click any of the table headers to sort the hosts. Highlight a row and right-click it to bring up a menu with options for that host.
Armitage will highlight the IP address of any host with sessions. If a pivot is in use, Armitage will make it bold as well.
Tabs
Armitage opens each dialog, console, and table in a tab below the module and target panels. Click the X button to close a tab.
You may right-click the X button to open a tab in a window, take a screenshot of a tab, or close all tabs with the same name (Figure 4).

Figure 4. Tabs management
Hold shift and click X to close all tabs with the same name. Hold shift + control and click X to open the tab in its own window.
You may drag and drop tabs to change their order.
Armitage provides several keyboard shortcuts to make your tab management experience as enjoyable as possible. Use Ctrl+T to take a screenshot of the active tab. Use Ctrl+D to close the active tab. Try Ctrl+Left and Ctrl+Right to quickly switch tabs. And Ctrl+W to open the current tab in its own window.
Consoles
Metasploit console, Meterpreter console, and shell interfaces each use a console tab. A console tab lets you interact with these interfaces through Armitage.
The console tab tracks your command history. Use the up arrow to cycle through previously typed commands. The down arrow moves back to the last command you typed.
In the Metasploit console, use the Tab key to complete commands and parameters. This works just like the Metasploit console outside of Armitage.
Use Ctrl Plus to make the console font size larger, Ctrl Minus to make it smaller, and Ctrl 0 to reset it. This change is local to the current console only. Visit Armitage -> Preferences to permanently change the font.
Press Ctrl F to show a panel that will let you search for text within the console.
Use Ctrl A to select all text in the console’s buffer. Armitage sends a use or a set PAYLOAD command if you click a module or a payload name in a console.
To open a Console go to View -> Console or press Ctrl+N.
On MacOS X and Windows, you must click in the edit box at the bottom of the console to type. Linux doesn’t have this problem. Always remember, the best Armitage experience is on Linux.
The Armitage console uses color to draw your attention to some information. To disable the colors, set the console.show_colors.boolean preference to false. You may also edit the colors through Armitage -> Preferences. Here is the Armitage color palette and the preference associated with each color: Figure 5.
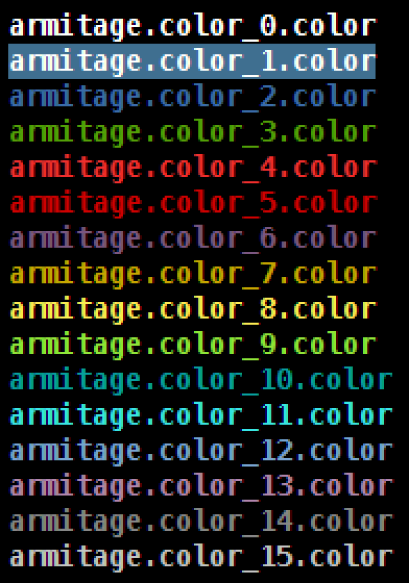
Figure 5. Armitage color palette
Logging
Armitage logs all console, shell, and event log output for you. Armitage organizes these logs by date and host. You’ll find these logs in the ~/.armitage folder. Go to View -> Reporting -> Acitivity Logs to open this folder.
Armitage also saves copies of screenshots and webcam shots to this folder.
Change the armitage log_everything boolean preference key to false to disable this feature.
Edit the armitage log_data_here folder to set the folder where Armitage should log everything to.
Export Data
Armitage and Metasploit share a database to track your hosts, services, vulnerabilities, credentials, loots, and user-agent strings captured by browser exploit modules.
To get this data, go to View -> Reporting -> Export Data. This option will export data from Metasploit and create easily parsable XML and tab separated value (TSV) files.
Host Management
Dynamic Workspaces
Armitage’s dynamic workspaces feature allows you to create views into the hosts’ database and quickly switch between them. Use Workspaces -> Manage to manage your dynamic workspaces. Here you may add, edit and remove workspaces you create (Figure 6).
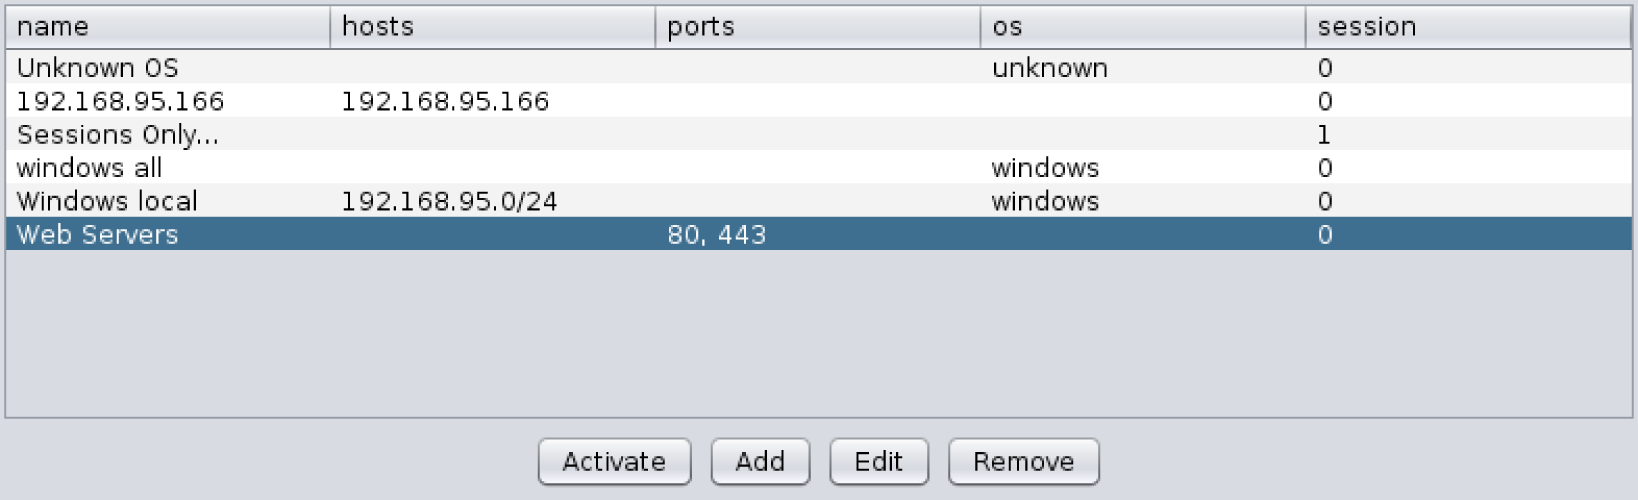
Figure 6. Managing your dynamic workspaces
To create a new dynamic workspace, press Add. You will see the following dialog: Figure 7.

Figure 7. Creating a new dynamic workspace
Give your dynamic workspace a name. It doesn’t matter what you call it. This description is for you.
If you’d like to limit your workspace to hosts from a certain network, type a network description in the Hosts field. A network description might be: 10.10.0.0/16 to display hosts between 10.10.0.0-10.10.255.255. Separate multiple networks with a comma and a space.
You can cheat with the network descriptions a little. If you type: 192.168.95.0, Armitage will assume you mean 192.168.95.0-255. If you type: 192.168.0.0, Armitage will assume you mean 192.168.0.0-192.168.255.255.
Fill out the Ports field to include hosts with certain services. Separate multiple ports using a comma and a space.
Use the OS field to specify which operating system you’d like to see in this workspace. You may type a partial name, such as “indows”. Armitage will only include hosts whose OS name includes the partial name. This value is not case sensitive. Separate multiple operating systems with a comma and a space.
Select Hosts with sessions only to only include hosts with sessions in this dynamic workspace.
You may specify any combination of these items when you create your dynamic workspace.
Each workspace will have an item in the Workspaces menu. Use these menu items to switch between workspaces. You may also use Ctrl+1 through Ctrl+9 to switch between your first nine workspaces.
Use Workspaces -> Show All or Ctrl+Backspace to display the entire database.
Armitage will only display 512 hosts at any given time, no matter how many hosts are in the database. If you have thousands of hosts, use this feature to segment your hosts into useful target sets.
Importing Hosts
To add host information to Metasploit, you may import it. The Hosts -> Import Hosts menu accepts the following files:
• Acunetix XML
• Amap Log
• Amap Log -m
• Appscan XML
• Burp Session XML
• Foundstone XML
• IP360 ASPL
• IP360 XML v3
• Microsoft Baseline Security Analyzer
• Nessus NBE
• Nessus XML (v1 and v2)
• NetSparker XML
• NeXpose Simple XML
• NeXpose XML Report
• Nmap XML
• OpenVAS Report
• Qualys Asset XML
• Qualys Scan XML
• Retina XML
You may manually add hosts with Hosts -> Add Hosts.
NMap Scans
You may also launch an NMap scan from Armitage and automatically import the results into Metasploit. The Hosts ->NMap Scan menu has several scanning options.
Optionally, you may type db_nmap in a console to launch NMap with the options you choose.
NMap scans do not use the pivots you have set up.
MSF Scans
Armitage bundles several Metasploit scans into one feature called MSF Scans. This feature will scan for a handful of open ports. It then enumerates several common services using Metasploit auxiliary modules built for the purpose.
Highlight one or more hosts, right-click, and click Scan to launch this feature. You may also go to Hosts -> MSF Scans to launch these as well.
These scans work through a pivot and against IPv6 hosts as well. These scans do not attempt to discover if a host is alive before scanning. To save time, you should do host discovery first (e.g. an ARP scan, ping sweep, or DNS enumeration) and then launch these scans to enumerate the discovered hosts.
DNS Enumeration
Another host discovery option is to enumerate a DNS server. Go to Hosts -> DNS Enum to do this. Armitage will present a module launcher dialog with several options. You will need to set the DOMAIN option to the domain you want to enumerate. You may also want to set NS to the IP address of the DNS server you’re enumerating.
If you’re attacking an IPv6 network, DNS enumeration is one option to discover the IPv6 hosts on the network.
Database Maintenance
Metasploit logs everything you do to a database. Over time your database will become full of stuff. If you have a performance problem with Armitage, try clearing your database. To do this, go to Hosts -> Clear Database.
Exploitation
Remote Exploits
Before you can attack, you must choose your weapon. Armitage makes this process easy. Use Attacks -> Find Attacks to generate a custom Attack menu for each host. To exploit a host: right-click it, navigate to Attack, and choose an exploit. To show the right attacks, make sure the operating system is set for the host.
The Attack menu limits itself to exploits that meet a minimum exploit rank of great. Some useful exploits are ranked good and they won’t show in the attack menu. You can launch these using the module browser.
Use Armitage -> Set Exploit Rank to change the minimum exploit rank.
Optionally, if you’d like to see hosts that are vulnerable to a certain exploit, browse to the exploit in the module browser. Right-click the module. Select Relevant Targets. Armitage will create a dynamic workspace that shows hosts that match the highlighted exploit. Highlight all of the hosts and double-click the exploit module to attack all of them at once.
Which exploit?
Learning which exploits to use and when comes with experience. Some exploits in Metasploit implement a check function. These check functions connect to a host and check if the exploit applies. Armitage can use these check functions to help you choose the right exploit when there are many options. For example, targets listening on port 80 will show several web application exploits after you use Find Attacks. Click the Check exploits menu to run the check command against each of these. Once all the checks are complete, press Ctrl F and search for vulnerable hosts. This will lead you to the right exploit (Figure 8).
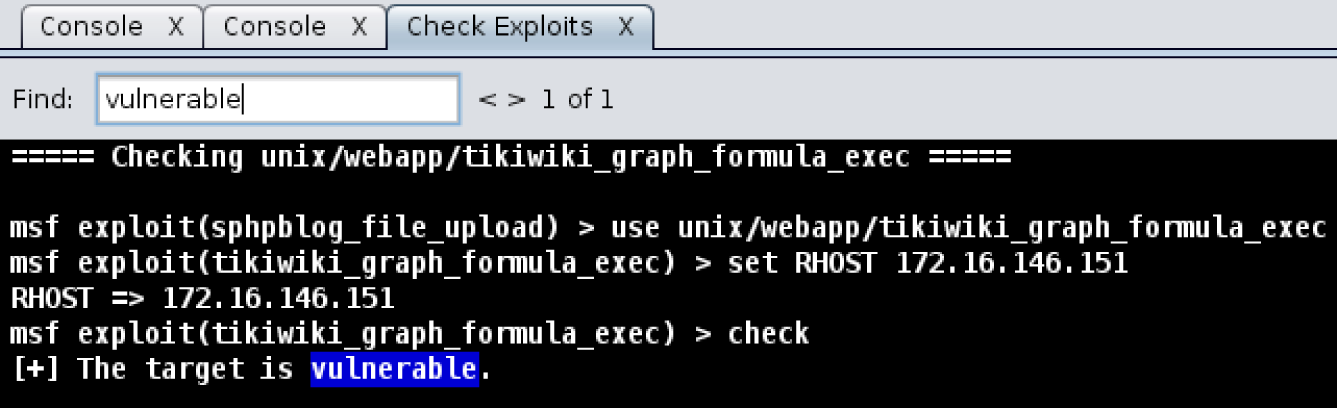
Figure 8. Finding the right exploit
Clicking a host and selecting Services is another way to find an exploit. If you have NMap scan results, look at the information field and guess which server software is in use. Use the module browser to search for any Metasploit modules related to that software. One module may help you find information required by another exploit. Apache Tomcat is an example of this. The tomcat_mgr_login module will search for a username and password that you can use. Once you have this, you can launch the tomcat_mgr_deploy exploit to get a shell on the host.
Launching Exploits
Armitage uses this dialog to launch exploits: Figure 9.
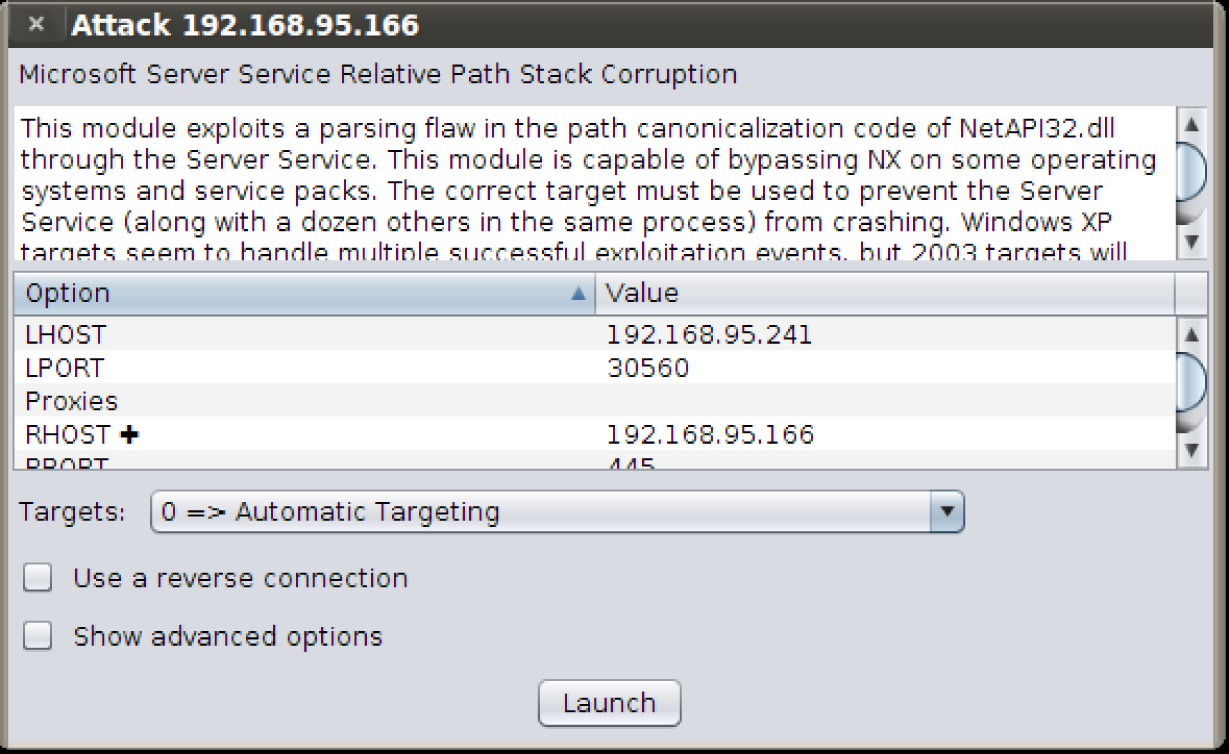
Figure 9. Launching exploits
The exploit launch dialog lets you configure options for a module and choose whether to use a reverse connect payload.
Armitage presents options in a table. Double-click the value to edit it. If an option requires a filename, double-click the option to open up a file chooser dialog. You may also check Show advanced options to view and set advanced options.
If you see SOMETHING + in a table, this means you can double-click that item to launch a dialog to help you configure its value. This convention applies to the module launcher and preferences dialogs.
Some penetration testers organize their targets into text files to make them easier to track. Armitage can make use of these files too. Double-click RHOST + and select your targets file. The file must contain one IP address per line. This is an easy way to launch an attack or action against all of those hosts.
For remote exploits, Armitage chooses your payload for you. Generally, Armitage will use Meterpreter for Windows targets and a command shell payload for UNIX targets.
Click Launch to run the exploit. If the exploit is successful, Armitage will make the host red and surround it with lightning bolts. Metasploit will also print a message to any open consoles.
Automatic Exploitation
If manual exploitation fails, you have the hail mary option. Attacks -> Hail Mary launches this feature. Armitage’s Hail Mary feature is a smart db_autopwn. It finds exploits relevant to your targets, filters the exploits using known information, and then sorts them into an optimal order.
This feature won’t find every possible shell, but it’s a good option if you don’t know what else to try.
Client-side Exploits
Through Armitage, you may use Metasploit’s client-side exploits. A client-side attack is one that attacks an application and not a remote service. If you can’t get a remote exploit to work, you’ll have to use a client-side attack.
Use the module browser to find and launch client-side exploits. Search for fileformat to find exploits that trigger when a user opens a malicious file. Search for browser to find exploits that server browser attacks from a web server built into Metasploit.
Client-side Exploits and Payloads
If you launch an individual client-side exploit, you have the option of customizing the payload that goes with it. Armitage picks same defaults for you.
In a penetration test, it’s usually easy to get someone to run your evil package. The hard part is to get past network devices that limit outgoing traffic. For these situations, it helps to know about meterpreter’s payload communication options. There are payloads that speak HTTP, HTTPS, and even communicate to IPv6 hosts. These payloads give you options in a tough egress situation.
To set the payload, double-click PAYLOAD in the option column of the module launcher. This will open a dialog asking you to choose a payload (Figure 10).
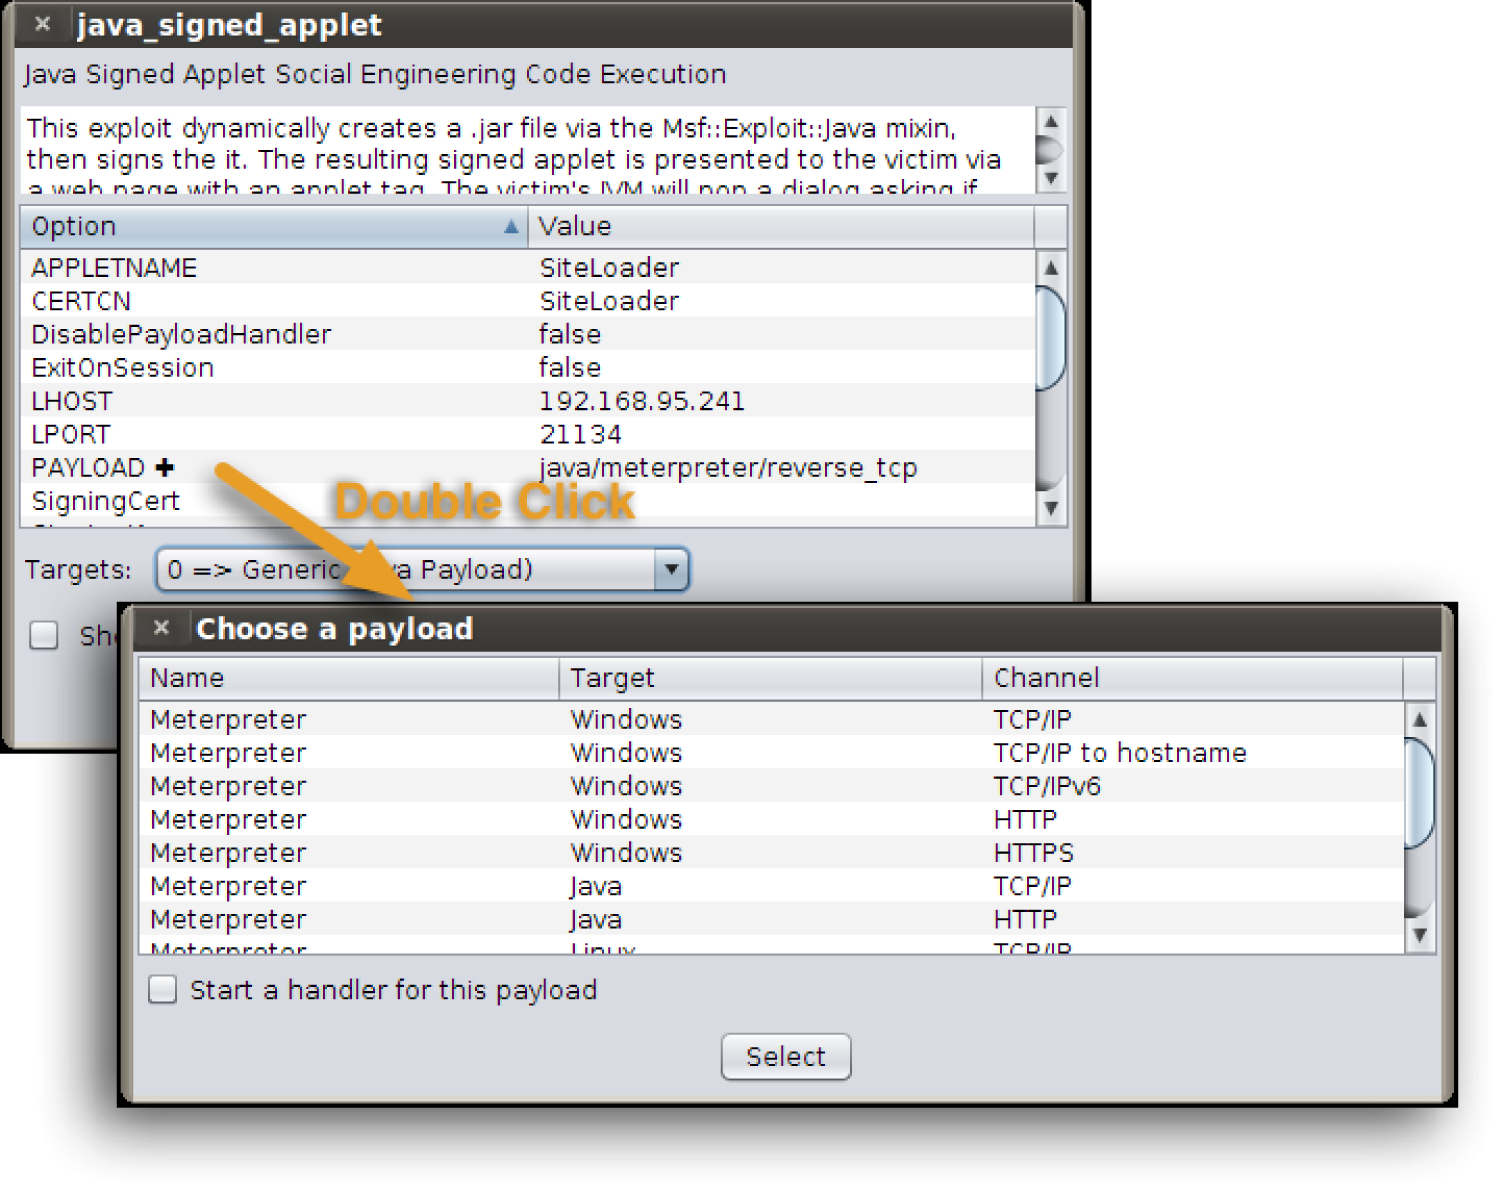
Figure 10. Choosing a payload
Highlight a payload and click Select. Armitage will update the PAYLOAD, DisablePayloadHandler, ExitOnSession,LHOST, and LPORT values for you. You’re welcome to edit these values as you see fit.
If you select the Start a handler for this payload option, Armitage will set the payload options to launch a payload handler when the exploit launches. If you did not select this value, you’re responsible for setting up a multi/handler for the payload.
Payload Handlers
A payload handler is a server that runs in Metasploit. Its job is to wait for a payload to connect to your Metasploit and establish a session.
To quickly start a payload handler, navigate to Armitage -> Listeners. A bind listener attempts to connect to a payload listening for a connection. A reverse listener waits for the payload to connect back to you.
You may set up shell listeners to receive connections from netcat.
Go to View -> Jobs to see which handlers are running.
Generate a Payload
Exploits are great, but don’t ignore the simple stuff. If you can get a target to run a program, then all you need is an executable. Armitage can generate an executable from any of Metasploit’s payloads. Choose a payload in the module browser, double-click it, select the type of output, and set your options. Once you click launch, a save dialog will ask you where to save the file to (Figure 11).
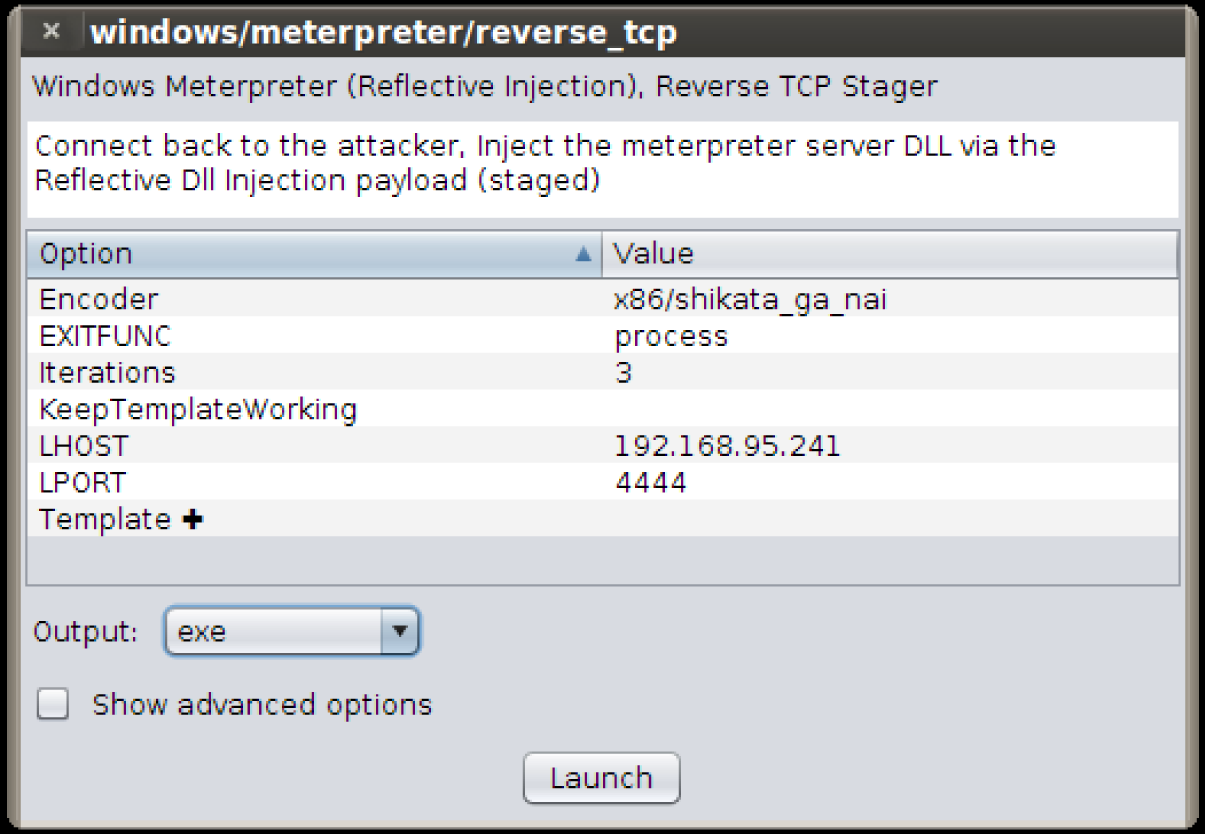
Figure 11. Saving the file
To create a Windows trojan binary, set the output type to exe. Set the Template option to a Windows executable. Set KeepTemplateWorking if you’d like the template executable to continue to work as normal. Make sure you test the resulting binary. Some template executables will not yield a working executable.
Remember, if you have a payload, it needs a handler. Use the multi/handler output type to create a handler that waits for the payload to connect. This option offers more flexibility and payload options than the Armitage ->Listeners menu.
If you plan to start a handler and then generate a payload, here’s a tip that will save you some time. First, configure a multi/handler as described. Hold down Shift when you click Launch. This will tell Armitage to keep the module launch dialog open. Once your handler is started, change the output type to the desired value, and click Launch again. This will generate the payload with the same values used to create the multi/handler.
Post Exploitation
Managing Sessions
Armitage makes it easy to manage the meterpreter agent once you successfully exploit a host. Hosts running a meterpreter payload will have a Meterpreter N menu for each Meterpreter session (Figure 12).
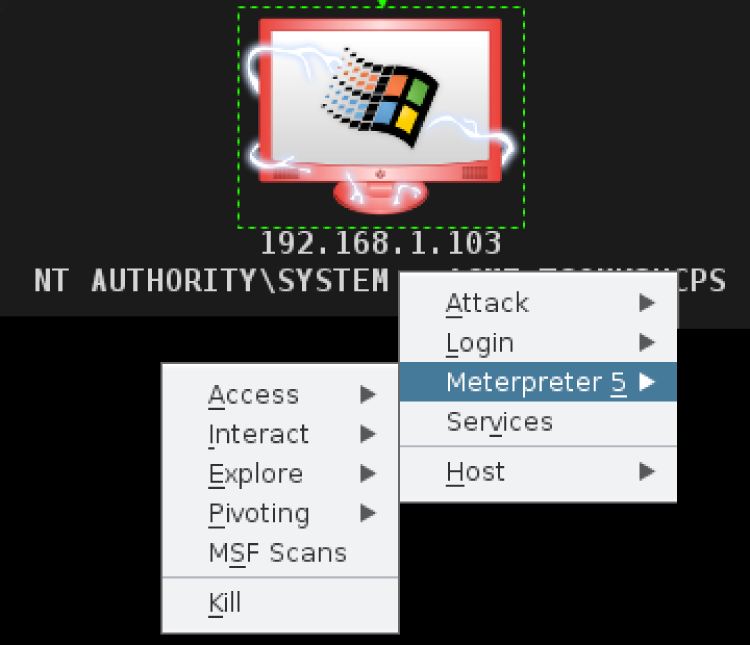
Figure 12. Meterpreter menu
If you have shell access to a host, you will see a Shell N menu for each shell session. Right-click the host to access this menu. If you have a Windows shell session, you may go to Shell N -> Meterpreter to upgrade the session to a Meterpreter session. If you have a UNIX shell, go to Shell N -> Upload to upload a file using the UNIX printf command.
Privilege Escalation
Some exploits result in administrative access to the host. Other times, you need to escalate privileges yourself. To do this, use the Meterpreter N -> Access -> Escalate Privileges menu. This will highlight the privilege escalation modules in the module browser.
Try the getsystem post module against Windows XP/2003 era hosts.
Token Stealing
Another privilege escalation option is token stealing. When a user logs onto a Windows host, a token is generated and acts like a temporary cookie to save the user the trouble of retyping their password when they try to access different resources. Tokens persist until a reboot. You may steal these tokens to assume the rights of that user.
To see which tokens are available to you, go to Meterpreter N -> Access -> Steal Token. Armitage will present a list of tokens to you. Click Steal Token to steal one.
If you want to revert to your original token, press Revert to Self. The Get UID button shows your current user ID.
Session Passing
Once you exploit a host, duplicating your access should be a first priority. Meterpreter N -> Access -> Pass Session will inject meterpreter into memory and execute it for you. By default this option is configured to call back to Armitage’s default Meterpreter listener. Just click Launch.
You may also use Pass Session to send Meterpreter to a friend. Set LPORT and LHOST to the values of their Meterpreter multi/handler.
If your friend uses Armitage, have them type set in a Console tab and report the LHOST and LPORT values to you. These are the values for their default Meterpreter listener.
File Browser
Meterpreter gives you several options for exploring a host once you’ve exploited it. One of them is the file browser. This tool will let you upload, download, and delete files. Visit Meterpreter N -> Explore -> Browse Files to access the File Browser.
Right-click a file to download or delete it. If you want to delete a directory, make sure it’s empty first.
You may download entire folders or individual files. Go to View -> Downloads to access your downloaded files.
If you have system privileges, you may modify the file timestamps using the File Browser. Right-click a file or directory and go to the Timestamp menu. This features works like a clipboard. Use Get MACE Values to capture the timestamps of the current file. Right-click another file and use Set MACE Values to update the timestamps of that file.
Command Shell
You can reach a command shell for a host through Meterpreter N -> Interact -> Command Shell. The Meterpreter shell is also available under the same parent menu.
Navigating to the Meterpreter N menu for each action gets old fast. Right-click inside the Meterpreter shell window to see the Meterpreter N menu items right away.
Close the command shell tab to kill the process associated with the command shell.
VNC
To interact with a desktop on a target host, go to Meterpreter N -> Interact -> Desktop (VNC). This will stage a VNC server into the memory of the current process and tunnel the connection through Meterpreter. Armitage will provide you the details to connect a local VNC client to your target.
Screenshots and Webcam Spying
To grab a screenshot use Meterpreter N -> Explore -> Screenshot. There is a Webcam Shot option in the same location. This option snaps a frame from the user’s webcam.
Right-click a screenshot or webcam shot image to change the zoom for the tab. This zoom preference will stay, even if you refresh the image. Click Refresh to update the screenshot or grab another frame from the webcam. ClickWatch (10s) to automatically snap a picture every ten seconds.
Process Management and Key Logging
Go to Meterpreter N -> Explore -> Show Processes to see a list of processes on your victim. Use Kill to kill the highlighted processes.
Meterpreter runs in memory. It’s possible to move Meterpreter from one process to another. This is called migration. Highlight a process and click Migrate to migrate to another process. Your session will have the permissions of that process.
While in a process, it’s also possible to see keystrokes from the vantage point of that process. Highlight a process and click Log Keystrokes to launch a module that migrates meterpreter and starts capturing keystrokes. If you key log from explorer.exe you will see all of the keys the user types on their desktop.
If you choose to migrate a process for the purpose of key logging, you should duplicate your session first. If the process Meterpreter lives in closes, your session will go away.
Post-exploitation Modules
Metasploit has several post-exploitation modules too. Navigate the post branch in the module browser. Double-click a module and Armitage will show a launch dialog. Armitage will populate the module’s SESSION variable if a compromised host is highlighted. Each post-exploitation module will execute in its own tab and present its output to you there.
To find out which post modules apply for a session: right-click a compromised host and navigate to Meterpreter N ->Explore -> Post Modules or Shell N -> Post Modules. Clicking this menu item will show all applicable post modules in the module browser.
Metasploit saves post-exploitation data into a Loot database. To view this data go to View -> Loot.
You may highlight multiple hosts and Armitage will attempt to run the selected post module against all of them. Armitage will open a new tab for the post module output of each session. This may lead to a lot of tabs. Hold down shift and click X on one of the tabs to close all tabs with the same name.
Maneuver
Pivoting
Metasploit can launch attacks from a compromised host and receive sessions on the same host. This ability is called pivoting.
To create a pivot, go to Meterpreter N -> Pivoting -> Setup…. A dialog will ask you to choose which subnet you want to pivot through the session.
Once you’ve set up pivoting, Armitage will draw a green line from the pivot host to all targets reachable by the pivot you created. The line will become bright green when the pivot is in use.
To use a pivot host for a reverse connection, set the LHOST option in the exploit launch dialog to the IP address of the pivot host.
Scanning and External Tools
Once you accessed a host, it’s good to explore and see what else is on the same network. If you’ve set up pivoting, Metasploit will tunnel TCP connections to eligible hosts through the pivot host. These connections must come from Metasploit.
To find hosts on the same network as a compromised host, right-click the compromised host and go to Meterpreter N-> ARP Scan or Ping Sweep. This will show you which hosts are alive. Highlight the hosts that appear, right-click, and select Scan to scan these hosts using Armitage’s MSF Scan feature. These scans will honor the pivot you set up.
External tools (e.g., nmap) will not use the pivots you’ve set up. You may use your pivots with external tools through a SOCKS proxy though. Go to Armitage -> SOCKS Proxy… to launch the SOCKS proxy server.
The SOCKS4 proxy server is one of the most useful features in Metasploit. Launch this option and you can set up your web browser to connect to websites through Metasploit. This allows you to browse internal sites on a network like you’re local. You may also configure proxychains on Linux to use almost any program through a proxy pivot.
Password Hashes
To collect Windows password hashes, visit Meterpreter N -> Access -> Dump Hashes. You need administrative privileges to do this.
There are two hash dumping options. One is the lsass method and the other is the registry method. The lsass method attempts to grab the password hashes from memory. This option works well against Windows XP/2003 era hosts. The registry method works well against modern Windows systems.
You may view collected hashes through View -> Credentials. For your cracking pleasure, the Export button in this tab will export credentials in pwdump format. You may also use the Crack Passwords button to run John the Ripper against the hashes in the credentials database.
Pass-the-Hash
When you login to a Windows host, your password is hashed and compared to a stored hash of your password. If they match, you’re in. When you attempt to access a resource on the same Windows domain, the stored hash is sent to the other host and used to authenticate you. With access to these hashes, you can use this mechanism to take over other hosts on the same domain. This is called a pass-the-hash attack.
Use Login -> psexec to attempt a pass-the-hash attack against another Windows host. Click Check all Credentials to have Armitage try all hashes and credentials against the host.
The pass-the-hash attack attempts to upload a file and create a service that immediately runs. Only administrator users can do this. Further, your targets must be on the same active directory domain for this attack to work.
Using Credentials
Armitage will create a Login menu on each host with known services. Right-click a host and navigate to Login ->service. This will open a dialog where you may choose a username and password from the credentials known to Metasploit.
Some services (e.g. telnet and ssh) will give you a session when a login succeeds. Others will not.
Check the Try all credentials option and Metasploit will login to the service with each of the known credentials. Metasploit automatically adds each successful login to the credentials table for you.
The best way into a network is through valid credentials. Remember that a successful username/password combination from one service may give you access to another host that you couldn’t exploit.
Password Brute Force
Metasploit can attempt to guess a username and password for a service for you. This capability is easy to use through the module browser.
Metasploit supports brute forcing through the auxiliary modules named service_login. Type login in the module browser to search for them.
To brute force a username and password over SSH, browse to auxiliary/scanner/ssh/ssh_login in the modules panel and double-click it.
If you know the username, set the USERNAME variable. If you’d like Metasploit to brute force the username, select a value for USER_FILE. Double-click the USER_FILE variable to bring up a file chooser where you can select a text file containing a list of usernames.
Metasploit has many files related to brute forcing in the [metasploit install]/data/wordlists directory.
Set the PASS_FILE variable to a text file containing a list of passwords to try.
If you’re only brute forcing one host and you have a lot of usernames/passwords to try, I recommend using an external tool like Hydra. Metasploit does not make several parallel connections to a single host to speed up the process. This lesson can be taken one step further – use the right tool for each job.
Remote Metasploit
Remote Connections
You can use Armitage to connect to an existing Metasploit instance on another host. Working with a remote Metasploit instance is similar to working with a local instance. Some Armitage features require read and write access to local files to work. Armitage’s deconfliction server adds these features and makes it possible for Armitage clients to use Metaspoit remotely.
Connecting to a remote Metasploit requires starting a Metasploit RPC server and Armitage’s deconfliction server. With these two servers set up, your use of Metasploit will look like this diagram: Figure 13.

Figure 13. Your usage of Metasploit with Metasploit RPC server and Armitage’s deconfliction server
Multi-Player Metasploit Setup
The Armitage Linux package comes with a teamserver script that you may use to start Metasploit’s RPC daemon and Armitage’s deconfliction server with one command. To run it:
cd /path/to/metasploit/msf3/data/armitage
./teamserver [external IP address] [password]
This script assumes armitage.jar is in the current folder. Make sure the external IP address is correct (Armitage doesn’t check it) and that your team can reach port 55553 on your attack host. That’s it.
Metasploit’s RPC daemon and the Armitage deconfliction server are not GUI programs. You may run these over SSH.
The Armitage team server communicates over SSL. When you start the team server, it will present a server fingerprint. This is a SHA-1 hash of the server’s SSL certificate. When your team members connect, Armitage will present the hash of the certificate the server presented to them. They should verify that these hashes match.
Do not connect to 127.0.0.1 when a teamserver is running. Armitage uses the IP address you’re connecting to determine whether it should use SSL (teamserver, remote address) or non-SSL (msfrpcd, localhost). You may connect Armitage to your teamserver locally, use the [external IP address] in the Host field.
Armitage’s red team collaboration setup is CPU sensitive and it likes RAM. Make sure you have 1.5GB of RAM in your team server.
Multi-Player Metasploit
Armitage’s red team collaboration mode adds a few new features. These are described here:
View -> Event Log opens a shared event log. You may type into this log and communicate as if you’re using an IRC chat room. In a penetration test this event log will help you reconstruct major events (Figure 14).

Figure 14. The event log
Multiple users may use any Meterpreter session at the same time. Each user may open one or more command shells, browse files, and take screenshots of the compromised host.
Metasploit shell sessions are automatically locked and unlocked when in use. If another user is interacting with a shell, Armitage will warn you that it’s in use.
Some Metasploit modules require you to specify one or more files. If a file option has a + next to it, then you may double-click that option name to choose a local file to use. Armitage will upload the chosen local file and set the option to its remote location for you. Generally, Armitage will do its best to move files between you and the shared Metasploit server to create the illusion that you’re using Metasploit locally.
Penetration testers will find this feature invaluable. Imagine you’re working on a pen test and come across a system you don’t know much about. You can reach back to your company and ask your local expert to load Armitage and connect to the same Metasploit instance. They will immediately have access to your scan data and they can interact with your existing sessions… seamlessly.
Or, imagine that you’re simulating a phishing attack and you get access to a host. Your whole team can now work on the same host. One person can search for data, another can set up a pivot and search for internal hosts to attack, and another can work on persistence. The sky is the limit here.
Some meterpreter commands may have shortened output. Multi-player Armitage takes the initial output from a command and delivers it to the client that sent the command. Additional output is ignored (although the command still executes normally). This limitation primarily affects long running meterpreter scripts.
Scripting Armitage
Cortana
Armitage includes Cortana, a scripting technology developed through DARPA’s Cyber Fast Track program. With Cortana, you may write red team bots and extend Armitage with new features. You may also make use of scripts written by others.
Cortana is based on Sleep, an extensible Perl-like language. Cortana scripts have a .cna suffix.
Read the Cortana Tutorial to learn more about how to develop bots and extend Armitage (Figure 15).
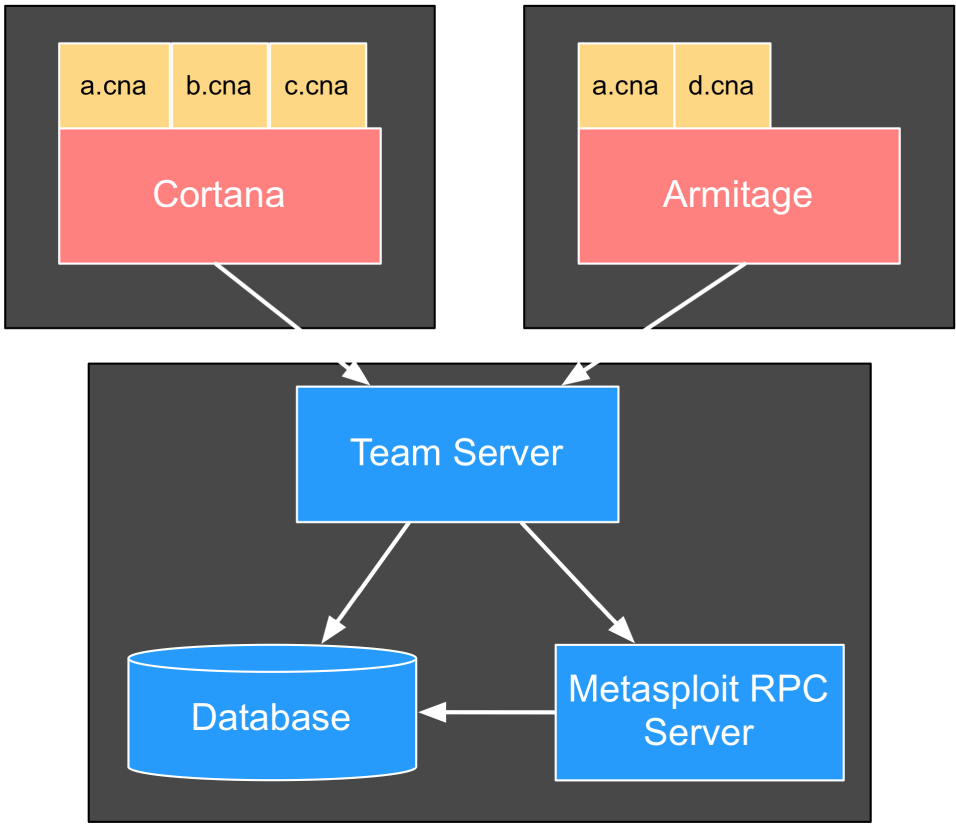
Figure 15. The Cortana Tutorial
Stand-alone Bots
A stand-alone version of Cortana is distributed with Armitage. You may connect the stand-alone Cortana interpreter to an Armitage team server.
Here’s a helloworld.cna Cortana script:
on ready { println(“Hello World!”); quit(); }
To run this script, you will need to start Cortana. First, stand-alone Cortana must connect to a team server. The team server is required because Cortana bots are another red team member.
If you want to connect multiple users to Metasploit, you have to start a team server.
Next, you will need to create a connect.prop file to tell Cortana how to connect to the team server you started. Here’s an example connect.prop file:
host=127.0.0.1 port=55553 user=msf pass=password nick=MyBot
Now, to launch your bot:
cd /path/to/metasploit/msf3/data/armitage
java -jar cortana.jar connect.prop helloworld.cna
Script Management
You don’t have to run Cortana bots stand-alone. You may load any bot into Armitage directly. When you load a bot into Armitage, you do not need to start a teamserver. Armitage is able to deconflict its actions from any loaded bots on its own.
You may also use Cortana scripts to extend Armitage and add new features to it. Cortana scripts may define keyboard shortcuts, insert menus into Armitage, and create simple user interfaces.
To load a script into Armitage, go to Armitage -> Scripts. Press Load and choose the script you would like to load. Scripts loaded in this way will be available each time Armitage starts.
Output generated by bots and Cortana commands are available in the Cortana console. Go to View -> Script Console.
Resources
Cortana is a full featured environment for developing red team bots and extending Armitage. If you’d like to learn more, take a look at the following resources:
• Cortana Tutorial for Scripters
• Public Cortana Script Repository
No comments:
Post a Comment